
Installation Guide

©2020 mohawkflooring.com | 07/2020 | Page 3
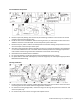
4. Assemble the first row tongue side toward wall. Insert the end tongue into the end groove and
rotate downward to assemble. Keep the planks aligned and the joints closed.
5. Two spacers thick side to thick side equals 3/8”.
6. Provide a 3/8” space for expansion on all sides. First piece must be at least 8” long. Start new rows
with pieces trimmed from previous row. Ensure at least a 12” end joint offset.
7. At a slight angle, insert the tongue of plank 2 into the groove of plank 1 until the Mohawk laminated
flooring edges meet, and then rotate down until the joints lock.
8. Join the short end of the plank first. There will be a gap on the long side joints when the plank is
rotated down.
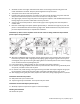
9. Raise the outside edge of the plank upward approximately 1”. Maintain this angle as you push the
plank in until the Mohawk laminated flooring edges meet. Rotate downward on the plank until the
joint locks. Repeat these steps to complete the installation.
Installation Tip: Place a carton of planks across the end of the row being installed to keep installed
planks in place during installation.
10. Alternate Tap Method: Align the tongues into the grooves of the long and short sides of the planks.
Install the long side first with a tapping block by tapping lightly along the long side until the joint is
closed tightly. Then tap the end using the tapping block into a locked position. Note: Uneven tapping
or use of excessive force may damage the joint.
11. Ensure there will be a 3/8” gap (after the joint is closed) to the wall for expansion.
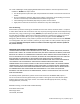
12. For the last row, align the plank to be used on top of the second to last row. Using a full width plank
as a spacer, trace wall contour and cut plank.
13. For the last row, install the long side tongue into the groove with the end joint aligned. Using a pull
bar and hammer, work evenly along the length of the plank and lightly tap the joint closed.
14. After tapping the long side joint closed, tap the short side closed, using a tapping block or a pull bar.
Installation Under Doorway Frames
15. Slide plank under pre-cut door frame.
16. Tap the long side joint closed first. Then tap the end joint closed.
Installation Around Fixed Objects (Such as Pipes)
17. Allow 3/8” expansion space around pipes or other fixed objects.
Finishing the Installation
18. Remove all spacers.