
Installation Guide


MOHAWK TECHNICAL SERVICES – HARD SURFACE | MOHAWK_TECH@MOHAWKIND.COM | 888.387.9881 1603_2020 | ES | 09/2020 | 9 of 12
Staple Down Installation Instructions
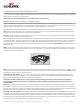
THICKNESS FASTENER GAUGE SIDE SPACING END SPACING
3/8" 20 4"-6" 1"
Tongue and groove engineered hardwood oors may be installed over wood suboors with the exception of parquet or Masonite. When installing engineered
wood planks, it is necessary to use the proper type of ooring stapler made for or properly adjusted to the thickness of the engineered wood ooring to
be installed.
NOTE: In order to reduce squeaks and noises created by the opposing oors, in addition to the ground cover in the crawlspace, a 15 lb. felt or rosin paper, or
equivalent underlayment must be installed over the suboor prior to the installation of the engineered wood ooring.
When installing 9/16" product, apply a thin bead of GLU1-D3 Mohawk Tongue & Groove Glue to the bottom side of the groove, to lock the tongue and groove
prole in place. This will reduce the potential for movement of the tongue and groove, which could contribute to squeak and crackle.
Layout the Job
Measure out from the ends of your starting wall the width of the plank plus plank thickness for expansion and mark both ends. Where possible, lay the ooring
at 90° angles to the oor joists. Make a chalk line along the starting wall using the marks you made.
Getting Started
Expansion space is required along the perimeter of the room(s) of intended installation. Expansion space is dictated by the thickness of the product, for example,
3/8" thick oor requires 3/8" expansion space, 1/2" thick oor requires 1/2" expansion space, etc.
Place the planks along your chalk line with the groove side facing the wall. Use brads or small nishing nails to secure the rst starter row along the wall edge 1"
to 2" from the ends and every 4" to 6" along the side. Counter sink the nails and ll with the wood ller that blends with the ooring installed. Place the nails in
a dark grain spot in the board. The base or shoe molding will cover the nails when installed after completion of the installation.
Blind nail at a 45° angle through the tongues. It will be easier if holes are pre-drilled in the tongues. Nail 1" to 2" from the ends and every 4" to 6" along
the sides. It will be necessary to blind nail the next two rows. A brad nailer with 1" to 1-3/8" brads can also be used to blind nail, and no pre-drilling is needed.
Continue the installation using an engineered wood ooring stapler, using recommended staples. Staple ooring 1" to 2" from ends and every 4" to 6" along
the edge tongues. See notes in oating section for end joint spacing and starting additional rows.
Recommended Pneumatic Floor Fastener
Staple 1" to 2" from the ends and every 4" to 6" along the tongue side of the engineered wood product to help insure a satisfactory installation. It is
recommended to initially set the compressor at 80 to 85 PSI and adjust the pressure as needed in order to properly set the fastener and prevent the fastener
from going through or breaking the tongues.
Improper stapling techniques can cause squeaks and/or surface dimpling of the oor. Adjustments may be necessary to provide adequate penetration of the
nail or staple into the nail pocket. Fasteners should be ush in the nail pocket and not beyond. Use a scrap piece of ooring material to set tools properly before
installation. Always use ooring installation tools with the factory designed oor plate attached to ensure proper fastener penetration angle.
Final Touches
Install the proper trim molding at the doorways to achieve the transition and along the walls to cover the edges of any gaps along the wall due to irregularity.
Complete the job by using the wood ller that coordinates with the installed engineered ooring to ll any gapping along the joints or areas where brad nails
were used in the trim or the ooring. Clean the nished oor with hardwood oor cleaner.
Floating Installation Instructions (Preparation)
Undercut Door Casings
Undercut all door casings 1/16" higher than the thickness of the ooring materials to be installed. Use a scrap piece of ooring as a guide. Lay the scrap
on the substrate and cut the casing with a handsaw or use a power jamb saw set at the correct height. Remove all moldings and wall-base, and undercut
all door casings.
Underlayment
Use Performance Accessory Underlayments or equivalent with equal or better specications. Underlayment requirements are very critical to a oating
installation. Excessive pad compression or compaction is a common cause of seam failure. Lay the underlayment on the oor with the moisture barrier facing up.
The direction of the underlayment should be parallel to the direction of the ooring to be installed.
For the rst row of ooring, the underlayment should be placed so that approximately 1" overlaps onto all perpendicular walls. Place the following row next
to the rst row on top of the lower moisture barrier overlap. Remove the adhesive strip and fold back the upper overlap on the second row. Make sure the
underlayment ts together tightly; don’t leave gaps. On the last row, place the underlayment 1" up the wall. To join rolls on the short side of the underlayment,
use a moisture resistant tape to connect the two pieces so water cannot penetrate the underlayment.