
Installation Guide


Mosaic Tile Installation
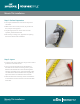
Step 3: Cutting Tile
• It is recommended to use a diamond blade, as blades
designed for ceramic tile will chip the stone and/or glass.
NOTE: Cut edges should be placed in corners where they
can be hidden.
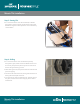
Step 4: Drilling
• It is recommended to use a drill bit that is specially
designed for glass, metal and stone. NOTE: The tile must
be securely clamped into place to prevent movement of
the tile during the drilling process.
• When drilling the hole, keep the bit and hole lubricated to
prevent chipping.
• Drill from both sides of the tile, starting with the back and
drilling half of the depth of the tile.
• Turn the tile over and complete the hole. This will prevent
the glass, metal and stone from chipping as the drill bit
exits the tile.
Mosaic Tile Installation
Page 2 of 4
Continued on next page
MOSAIC TILE INSTALLATION INSTRUCTIONS PAGE 2 of 4
• It is recommended to use a drill bit that is specially
designed for glass, metal and stone.
NOTE: The tile must be securely clamped into place to
prevent movement of the tile during the drilling process.
• When drilling the hole, keep the bit and hole lubricated
to prevent chipping.
• Drill from both sides of the tile, starting with the back
and drilling half of the depth of the tile.
• Turn the tile over and complete the hole. This will
prevent the glass, metal and stone from chipping as the
drill bit exits the tile.
4
STEP 4:
DRILLING
• It is recommended to use a diamond blade, as blades
designed for ceramic tile will chip the stone and/or glass.
NOTE: Cut edges should be placed in corners where
they can be hidden.
3
STEP 3:
CUTTING TILE
Continued on next page
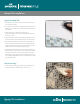
INSTALLATION
WALL TILE
Continued on next page
MOSAIC TILE INSTALLATION INSTRUCTIONS PAGE 2 of 4
• It is recommended to use a drill bit that is specially
designed for glass, metal and stone.
NOTE: The tile must be securely clamped into place to
prevent movement of the tile during the drilling process.
• When drilling the hole, keep the bit and hole lubricated
to prevent chipping.
• Drill from both sides of the tile, starting with the back
and drilling half of the depth of the tile.
• Turn the tile over and complete the hole. This will
prevent the glass, metal and stone from chipping as the
drill bit exits the tile.
4
STEP 4:
DRILLING
• It is recommended to use a diamond blade, as blades
designed for ceramic tile will chip the stone and/or glass.
NOTE: Cut edges should be placed in corners where
they can be hidden.
3
STEP 3:
CUTTING TILE
Continued on next page
INSTALLATION
WALL TILE