
Instructions / Assembly


©2021 mohawkgroup.com | 800.833.6954 1286_Aug/2021 Page 7/8
Multi-Directional Format (Follow No Order)
Tiles are to be placed without being concern for the arrow direction (random).
Mixing tiles from various boxes during installation will further blend color and design
elements. This process is essential for achieving optimal aesthetics.
Plank Tile Installation Methods
Fitting Of Tile
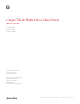
1. Start from the intersection point in the center of the oor. Install the tiles in one quadrant using the chalk lines as
guidelines. Fill in the area between the two chalk lines using the stair step method.
2. Continue to install tiles in a stair step or pyramid pattern, starting at the center point. Check to ensure tiles are properly
aligned at edges during the installation. (See gure to right).
3. Fit the tiles together by sliding them together, being careful not to trap face yarns between or under the edges of the tile.
As the tile is placed into position, start with a lower corner and press the tile into place in an upward motion with the palm
of the hand. The entire tile must be pressed with the installers’ palm. Do not try to put both corners down at the same time.
Do not jam or force the tiles too tightly.
4. Press or roll the tiles into the adhesive.
Important Tile Measurements
• When installing EcoFlex NXT, EcoFlex Matrix and EcoFlex AIR tiles,
the 10-tile measurement must be between 240 3/16” to 240 7/16”.
Please note: Tiles that are trimmed against the walls, baseboards, columns, etc. must be cut ush, but not so tight that
they are forced into position. Ensure that the adhesive spread is within 1/2” of walls and other obstructions
• All carpet tiles must be rolled with a 75 lb. or 100 lb. roller.
• A seam roller can be used to blend and enhance the seams. The loop pile modules will have some yarn blossoming at
the edges. The face yarn or primary backing will require occasional trimming.
© 2018 Mohawk Group | mohawkgroup.com
Page 7 / 9
Carpet Tile & Plank Direct Glue Down | INSTALLATION
Tile Installation Methods
%HIRUH\RXEHJLQWKHLQVWDOODWLRQFRQVXOWSURGXFWVSHFLôFDWLRQVWRGHWHUPLQHZKLFKLQVWDOODWLRQIRUPDWVDUHDSSURYHG6KRZQEHORZ
are some common installation formats.
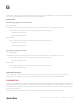
Ashlar Formats
In the Ashlar installation formats, each row of carpet tiles is shifted 8”, either in a brick format or vertically (see diagrams above).
This is a three-step process, i.e. each successive row of tiles must be offset one-third the length of the tile. It is not acceptable
to shift the tiles only one-half the length of the tiles (two-step process). This installation method maintains the random
DSSHDUDQFHRIWKHFDUSHWWLOHVHOLPLQDWLQJOLQHRQOLQHRUGDUNRQGDUNHIIHFWVWKDWFDQFUHDWHDVNHZHGORRNLQWKHôQLVKHG
installation.
Please note:&DUSHWWLOHSURGXFWVLQVWDOOHGLQWKH$VKODUIRUPDWZLOOQRWKDYHWKHVDPHôQLVKHGDSSHDUDQFHDVWKHVDPHSURGXFW
in a broadloom (12’ width).
Multi-Directional Format (Follow No Order)
Tiles are to be placed without being concern for the arrow direction (random). Mixing tiles from various boxes during
installation will further blend color and design elements. This process is essential for achieving optimal aesthetics.
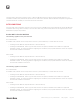
Plank Tile Installation Methods
12 x 36
MONOLITHIC
MONOLITHIC
STEPPING
HALF-LAP BRICK ASHLAR RANDOM HERRINGBONE BASKETWEAVE
PLANK
HALF-LAP
12 x 36 + 24 x 24
MONOLITHIC STEPPING HALF-LAP BRICK ASHLAR RANDOM HERRINGBONE
© 2018 Mohawk Group | mohawkgroup.com
Page 8 / 9
Carpet Tile & Plank Direct Glue Down | INSTALLATION
Installation
Make sure to inspect Mohawk Group carpet tiles for dye lot, style, quality and
shipping damage prior to installation. Do not install any product that has visible
problems. For concerns, please contact Technical Services at 800.833.6954.
6WDUWIURPWKHLQWHUVHFWLRQSRLQWLQWKHFHQWHURIWKHõRRU,QVWDOOWKHWLOHVLQ
one quadrant using the chalk lines as guidelines. Fill in the area between
the two chalk lines using the stair step method.
2. Continue to install tiles in a stair step or pyramid pattern, starting at the
center point. Check to ensure tiles are properly aligned at edges during the
LQVWDOODWLRQ6HHôJXUHWRULJKW
3. Fit the tiles together by sliding them together, being careful not to trap
face yarns between or under the edges of the tile. Press or roll the tiles into
the adhesive.
IMPORTANT:KHQLQVWDOOLQJ(FR)OH[1;7(FR)OH[0DWUL[DQG(FR)OH[
AIR tiles, the 10-tile measurement must be between 240 3/16” to 240 7/16”. As the tile is placed into position, start with a lower
corner and press the tile into place in an upward motion with the palm of the hand. The entire tile must be pressed with the
installers’ palm. Do not try to put both corners down at the same time. Do not jam or force the tiles too tightly.
When installing EcoFlex ICT tiles, the 10-tile measurement must be between 240” to 240 1/4”. As the tile is placed into position,
slightly apply pressure making sure the seams are tightly joined together.
Please note7LOHVWKDWDUHWULPPHGDJDLQVWWKHZDOOVEDVHERDUGVFROXPQVHWFPXVWEHFXWõXVKEXWQRWVRWLJKWWKDW
they are forced into position. Ensure that the adhesive spread is within 1/2” of walls and other obstructions.
4. All carpet tiles must be rolled with a 75 lb. or 100 lb. roller.
5. A seam roller can be used to blend and enhance the seams. The loop pile modules will have some yarn blossoming at the edges.
The face yarn will require occasional trimming.
Cutting Border Tiles
&XWVDUHPDGHIURPWKHEDFN,QVWDOOERUGHUWLOHVE\SODFLQJWKHWLOHIDFHGRZQH[DFWO\RQWRSRIWKHODVWURZRIôHOGWLOHVNHHSLQJWKH
arrows pointed in the same directions. This will be your cut tile. Using another tile, butt it against the wall, allowing it to lie
on top of the tile that is to be cut. Using this tile as a reference tile, score a line on the back of the tile that is to be cut. Cut the
tile along the reference line, being careful not to cut through the installed tile below. Install the cut tile with the cut edge along
the wall.
Use this same technique at doorways and around other objects that must be cut. The EcoFlex NXT and EcoFlex Matrix tile must have
the backing cut slightly shorter by cutting the backing at a slight angle. A transition strip must be used to protect any exposed edges.
Never use a cut edge as a seam.
Tiles can also be cut by measuring and cutting from the back with a straight edge and knife or by running them up the wall and
cutting them with a knife or wall trimmer.
Starting Point
Chalk line 1
Chalk line 2
© 2018 Mohawk Group | mohawkgroup.com
Page 7 / 9
Carpet Tile & Plank Direct Glue Down | INSTALLATION
Tile Installation Methods
%HIRUH\RXEHJLQWKHLQVWDOODWLRQFRQVXOWSURGXFWVSHFLôFDWLRQVWRGHWHUPLQHZKLFKLQVWDOODWLRQIRUPDWVDUHDSSURYHG6KRZQEHORZ
are some common installation formats.
Ashlar Formats
In the Ashlar installation formats, each row of carpet tiles is shifted 8”, either in a brick format or vertically (see diagrams above).
This is a three-step process, i.e. each successive row of tiles must be offset one-third the length of the tile. It is not acceptable
to shift the tiles only one-half the length of the tiles (two-step process). This installation method maintains the random
DSSHDUDQFHRIWKHFDUSHWWLOHVHOLPLQDWLQJOLQHRQOLQHRUGDUNRQGDUNHIIHFWVWKDWFDQFUHDWHDVNHZHGORRNLQWKHôQLVKHG
installation.
Please note:&DUSHWWLOHSURGXFWVLQVWDOOHGLQWKH$VKODUIRUPDWZLOOQRWKDYHWKHVDPHôQLVKHGDSSHDUDQFHDVWKHVDPHSURGXFW
in a broadloom (12’ width).
Multi-Directional Format (Follow No Order)
Tiles are to be placed without being concern for the arrow direction (random). Mixing tiles from various boxes during
installation will further blend color and design elements. This process is essential for achieving optimal aesthetics.
Plank Tile Installation Methods
12 x 36
MONOLITHIC
MONOLITHIC
STEPPING
HALF-LAP BRICK ASHLAR RANDOM HERRINGBONE BASKETWEAVE
PLANK
HALF-LAP
12 x 36 + 24 x 24
MONOLITHIC STEPPING HALF-LAP BRICK ASHLAR RANDOM HERRINGBONE