
Installation Guide


© 2018 Mohawk Group | mohawkgroup.com
Page 4 / 9
FlexLok Adhesive Tabs for Carpet Tile | INSTALLATION
Installation
• Inspect all carpet prior to cutting and contact your sales representative before installing the carpet if you discover any
problems. No claims will be allowed for visible defects after the carpet has been cut and installed.
• Never cut carpet over carpet, as this can result in over penetration of the blade and severed loops on the lower carpet.
• Carpet should be protected from heavy trafc and construction dust with a non-staining building material paper. Never use
plastic sheeting as it will trap moisture and prevent proper curing of the adhesive. Plastic may also leave residues that can
result in rapid soiling after removal. Plywood or Masonite boards should be used when moving heavy equipment.
• If any of the above conditions are not attainable, contact Mohawk Group Technical Services at 800.833.6954.
Required Equipment
The following items may be purchased from a local carpet workroom supplier:
• Razor Blades
• Straight Edge
• Scissors
• Framing Square
• 75 lb. Roller or 100 lb. Roller
• Razor Knives
• Chalk Line
• Tape Measure
• Floor Scraper
• Cement-based Patching Compound
Site Layout
1. The starting point in a modular installation must be as near to the center of the room as
possible and must be positioned to utilize the largest perimeter cut module size.
2. Snap a chalk line parallel to one major wall, bisecting the starting point. It will be necessary
to offset the center chalk line to assure perimeter modules will be at least half size.
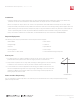
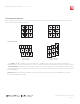
3. A second chalk line must be snapped from the starting point at 90° to the rst line. This
can be accomplished using a 6-8-10 or larger triangle, depending on the room size. (See
Illustration A) Meters or feet will be used to lay out the triangle in these proportions. A
framing square can also be used.
Pallet and Box Sequencing
It is very important to install carpet tiles in the order they were manufactured. This is easily accomplished by selecting
pallets in sequential order.
6’
8’
10’
ILLUSTRATION A