
Installation Instructions

DIRECTIONS FOR USE
Read and understand this installation guide and associated material safety
data sheet completely before beginning. Always use protective clothing
(gloves and eye protection) when working with grout. When installing tile,
follow applicable ANSI, TCNA, and NTCA installation standards.
INSTALLATION
PRIOR TO GROUTING FULL INSTALLATION, APPLY TO A TEST AREA
TO BECOME FAMILIAR WITH APPLICATION AND TO ENSURE
PRODUCT SATISFACTION.
PREPARATION FOR APPLYING MOHAWK
®
FAST TILE
GROUT WITH MOHAWK
®
FAST TILE
1. Walk over the tile and make sure all tiles are completely locked
together. Check for gaps and uniformity of gap joints. Thoroughly
mix grout with margin trowel and follow the instructions on the
packaging before use. Do not add water.
2. The application of a grout release (for tile) can be helpful to facilitate
cleaning of the grout from the tile surface, especially for porous
or matte-fi nished surfaces (including unglazed porcelain, matte-
fi nished glazed tile, and matte glass).
3. Move to APPLICATION OF GROUT section.
PREPARATION FOR APPLYING MOHAWK
®
FAST TILE
GROUT WITH TRADITIONAL TILE
1.
Ensure tile is fi rmly set and mortar is completely dry.
NOTE: When waterproofi ng, ensure waterproofi ng products are
installed over the mud bed (not under). Wait at least 24 hours after
setting tile before grouting with Mohawk
®
Fast Tile
™
Grout. Always
follow tile manufacturer’s instructions before grouting.
2.
Remove all spacers, water, debris and adhesive from tile joints.
Make sure the tile and the grout joints are clean and free of any
contaminants that may inhibit the bond. For best results, the surface
of tile should be at room temperature (70°F/21°C to 75°F/24°C).
Grout materials are affected by temperature and humidity variations.
Cool temperatures and/or high humidity will slow cure time.
3.
To facilitate cleaning it is helpful to pre-seal porous or matte-fi nished
surfaces (including unglazed porcelain, matte-fi nished glazed tile,
and matte glass) with a water-based sealer (natural stone) or grout
release (tile), including sides of natural stone the textured surfaces of
these tiles allow the grout to settle into the textured surfaces during
application making it more diffi cult to easily clean.
For glass, metal, marble, stone and other soft tiles, prepare a mock-
up and test the grout to ensure compatibility and that the grout may
be installed without scratching the tile.
4. Prior to re-grouting existing grout joints, completely remove all of the
old grout and any surface contaminants. Rinse any residual material out
of grout joints, then allow joints to completely dry before re-grouting.
APPLICATION OF GROUT
1. Lightly dampen a sponge with clean water and apply to the top of
the tile in a 2 to 10 square foot area (an arm’s length). Wet tile enough
to dampen while ensuring water is not pooling in grout joints.
INSTALLATION TIP: Add 1 tablespoon of Dawn
®
dishwashing liquid
per gallon of water and use to pre-wet tile to act as a grout release
on matte fi nished tile surfaces.
NOTE: Do not use Dawn
®
dishwashing liquid in water used to clean
up grout after application.
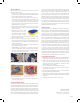
WHILE SPREADING GROUT
2. Grout small areas at a time. Typically
grout a 2 to 10 square foot area (an
arm’s length) or an area you can
comfortably grout in 2 to 3 minutes.
It is more a matter of time spent
spreading grout than distance covered. Spreading too far without
cleaning within two to three minutes will allow the grout to begin to
cure on the surface of the tile and create haze issues. Work grout back
and forth along the joint holding
the fl oat at a 45 degree angle to
the face of the tile ensuring grout
joints are completely packed.
Ensure you have enough product
on the surface of the tile while grouting to ensure you can easily move
it around and pack the joints. Then hold the fl oat at a 90 degree
angle to the face of the tile and moving the trowel at a 45 degree
angle to the line of the grout joint remove the excess grout with the
fl oat. This should remove 95% of the grout from the tile surface.
NOTE: For best results, do not grout a large area and make sure
to clean as you go.
PRE-MIXED FLEXIBLE GROUT
For use with all ceramic & porcelain tile
Grout Installation Guide
KEY FEATURES
•
Consistent Color
•
No Sealing Required
•
Superior Water Resistance
•
Stain Resistant
•
Indoor/Outdoor
•
Antimicrobial
Superior Water Resistance
™
Page 1