
FlexLok Installation Guide


!
!
FlexLoc!Adhesive!Tabs!
!
! 0115!
5
Ashlar Formats
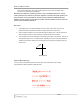
Brick Ashlar, 3-Step 8-Inch Offset
In the Ashlar installation formats, each row of carpet tiles is shifted 8 inches, either in a brick format or
vertically (see diagrams to the left). This is a three-step process, i.e. each successive row of tiles must
be offset one-third the length of the tile. It is not acceptable to shift the tiles only one-half the length of
the tiles (two-step process). This installation method maintains the random appearance of the carpet
tiles, eliminating line-on-line or dark-on-dark effects that can create a skewed look in the finished
installation.
Please Note: Carpet tile products installed in the Ashlar format will not have the same finished
appearance as the same product in a broadloom (12’ width).
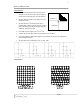
Multi-Directional Format (Follow No Order)
!
Tiles are to be placed without being concerned with the arrow direction (random). Mixing tiles
from various boxes during installation will further blend color and design elements. This process is
essential for achieving optimal aesthetics.
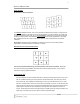
Cutting Border Tiles
Cuts are made from the back. Install border tiles by placing the tile face down exactly on top of the
last row of field tiles, keeping the arrows pointed in the same directions. This will be your cut tile.
Using another tile, butt it against the wall allowing it to lie on top of the tile that is to be cut. Using
this tile as a reference tile, score a line on the back of the tile that is to be cut. Cut the tile along the
reference line being careful not to cut through the installed tile below. Install the cut tile with the cut
edge along the wall. Use this same technique at doorways and other objects that must be cut
around. The EcoFlex NXT tile must have the backing cut slightly shorter by cutting the backing at a
slight angle. A transition strip must be used to protect any exposed edges.