
Installation Instructions


Accessories Needed:
15 lb. felt or rosin paper Performance Accessories Underlayment Flooring Adhesive
Coordinating Transition Strips or Molding Mohawk FloorCare Essentials
Hardwood & Laminate Floor Cleaner
Direct Glue Installation. Use Performance Accessories Adhesives and Sealers or
products that meet or exceed manufacturer’s adhesive and sealer specifications as
specified in Adhesive Selection section below. Refer to container labels for specifics on
trowel size, etc.
PRE-INSTALLATION & JOB SITE CONDITIONS ACCLIMATION
Do not deliver wood flooring to the jobsite or install wood flooring until appropriate
temperature and humidity conditions have been achieved. Flooring should be delivered
and stored inside the HVAC controlled portion of the jobsite for a minimum of 72 hours
prior to installation to allow for the product to acclimate. Flooring should be stacked with
at least a four inch (4”) airspace under the cartons. Remove any and all plastic wrap that
may have been used to ship the material. Make certain that the room temperature where
the product is acclimated is set to normal living conditions as described above. To
reduce the risk of moisture related failures, the subfloor and wood flooring must be of
similar moisture content. Test the subfloor by taking a minimum of 20 moisture content
readings for per 1000 square feet of subfloor using a pin type moisture meter. Average
these readings and include on the data sheet on page 7 of these instructions. Likewise
check the wood flooring moisture content and record on the same sheet. These
moisture readings are to be left as a permanent record of testing with the homeowner.
When both the subfloor and flooring are below 12% moisture content and the flooring is
within 4% of the subfloor moisture, acclimation is complete. The flooring is acclimated
and ready for installation only when it has reached a moisture content level consistent
with the job site and normal living conditions. Do not install the floor until these
moisture conditions are met.
SUB-FLOOR REQUIREMENTS: ON, ABOVE, or BELOW GRADE:
These recommendations are not intended to supersede federal, state or local building
codes, but as with many other interior finish products, may require modifying existing
structural components for a successful installation. Hardwood flooring is not a structural
component. The product warranty does not protect against loss caused by inadequate
subfloors, flooring substructures or improper installation of said substructures.
Engineered Hardwood Floors may be installed over any structurally sound sub-floor that
is flat, clean and dry on all grade levels.
All sub-floors should be:
CLEAN – Sub-floor must be clean and free of dirt, curing compounds, drywall mud, wax,
paint, oil, sealers, adhesives and other debris. These may be removed mechanically. Do
not install over chemically cleaned substrates.
FLAT – Within 3/16″ in 10′ radius (5 mm in 3 m) and/or 1/8″ in 6′ radius (3 mm in 2 m).
Sand high areas or joints. Fill low areas with a high compressive strength (min.3000 psi)
Portland base compound.
DRY – Wood floor moisture should be evaluated using the guidance supplied above
under the heading “Acclimation”. Concrete subfloors must be cured for a minimum of 30
days. The moisture content of a concrete subfloor should be tested using a Calcium
Chloride test (ASTM-F-1869 or ASTM F-710) and show no greater than 3 pounds per
1000 square feet in 24 hours or in accordance with ASTM F2170 latest version RH in-
situ probe. Test results must be recorded on page 7 of these instructions and left as a
permanent record of testing with the homeowner. If moisture levels exceed these limits,
DO NOT INSTALL the flooring until appropriate corrections are made.
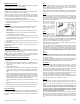
NOTE: Basements and crawl spaces must
be dry. Use of a 6 mil black polyethylene
membrane is required to cover 100% of the
crawl space earth. Crawl space clearance
from ground to underside of joist should be
no less than 18” and perimeter vent spacing
should be equal to 1.5% of the total square
footage of the crawl space area to provide cross ventilation.
Note: To increase reliability, sub-floor appropriate moisture testing should be performed
after the HVAC system has been in operation for a minimum of 14 days. Excess
moisture on any flooring substrate if not identified and corrected prior to installation will
cause floor covering failure. Our Warranties DO NOT cover any problems due to
moisture levels that exceed these guidelines
STRUCTURALLY SOUND – WOOD SUB-FLOOR: Nail or screw any areas that are
loose or squeak. Wood panels should exhibit an adequate fastening pattern,
glued/screwed or nailed as that system requires, using an acceptable nailing pattern.
Typical: 6” (15 cm) along bearing edges and 12” (31 cm) along intermediate supports.
Flatten edge swell as necessary. Replace any water-damaged, swollen or delaminated
sub-flooring or underlayment.
Building codes establish requirements for structural support components of flooring
systems which may not provide adequate rigidity and support for proper installation and
performance of a hardwood floor. Whenever possible, install flooring perpendicular to
the floor joists for maximum stability.
NOTE: When joist spacing exceeds the traditional 16 on center, manufacturer
recommends you apply a thin bead of Performance Accessories Tongue & Groove D3
glue to the bottom side of the groove to lock the tongue and groove profile in place. This
will reduce the potential for movement of the tongue and groove, which may contribute
to squeaking or crackle. When using this method of installation, you may continue to
choose to staple or nail down the hardwood depending on your preference. Using a D3
T&G glue with the staple reduces movement as the sub-floor deflects.
STRUCTURALLY SOUND – CONCRETE SUB-FLOOR: Concrete substrate should be
at least 30 days old constructed in accordance with ASTM E1745. Level substrate and
fill all cracks, holes and low spots with a polymer modified Portland cement patch or
leveling compound. Burnished or steel troweled concrete substrates must be inspected
for porosity by placing a few drops of water on the surface. If the water is not absorbed
within 3 minutes, the substrate should be considered non-porous. Abrade the surface
with 30-grit sandpaper until porosity is achieved. Glued down floors may be applied to
concrete with a rating of 3000 psi or greater. Glued down application over lightweight
concrete (less than 3000 psi) is not permissible.
Wood Sub-floors
Approved underlayment floor panels should meet or exceed the following:
• Plywood: Must be minimum CDX grade (exposure 1) and meet US Voluntary
Product Standard PS1 performance standard or Canadian performance standard
CAN/CSA 0325-0-92. The preferred thickness is 3/4″ (19 mm) as a sub-floor
[minimum 5/8″ (16 mm)] or 3/8″ (9.5 mm) as floor panel underlayment.
• Oriented Strand Board (OSB): Conforming to US Voluntary Product Standard
PS2 or Canadian performance standard CAN/CSA 0325-0-92 construction
sheathing. Check underside of panel for codes. When used as a sub-floor, the
panels must be tongue and groove and installed sealed side down. Minimum
thickness to be 23/32″ (18 mm) thick when used as a sub-floor or 3/8″ (9.5 mm) as
floor panel underlayment.
• Wafer board and Chipboard: Conforming to US Voluntary Product Standard PS2
or Canadian performance standard CAN/CSA 0325-0-92. Must be 3/4″ (19 mm)
thick when used as a sub-floor and 3/8″ (9.5 mm) thick when used as floor panel
underlayment.
• Particleboard: Must be a minimum 40-lb. density, stamped underlayment grade
and 3/4″ (19 mm) thick. (Floating installation only)
Solid Wood Sub-floors - Direct Glue or Staple Down Applications
• Minimum 3/4″ (19 mm) thick with a maximum width of 6″ (15 cm) installed at a 45°
angle to the floor joists.
• Group 1 dense softwood (Pine, Larch, Douglas fir, etc.) No. 2 common, kiln dried
with all board ends bearing on joists.
• For direct glue-down applications add 3/8″ (9.5 mm) approved floor
panel underlayment.
Existing Wood Flooring – Direct Glue or Staple Down Applications
• Existing engineered flooring must be well bonded/fastened. When gluing over
existing wood flooring, the surface finish must be abraded or removed to allow
adequate adhesive bond.
• Existing solid hardwood flooring that exceeds 6″ (15 mm) in width must be covered
with 3/8″ (9.5 mm) approved underlayment and fastened as required.
• Do not install over solid or engineered flooring attached directly to concrete.
Wood sub-floors should be well nailed or secured with screws. Nails should be ring
shank and screws need to be counter sunk. The wood sub-floor needs to be
structurally sound (meaning sub-floors without loose boards, vinyl or tile). If sub-floor
panels are a single layer, less than ¾” thick, add another single cross layer for
strength and stability (minimum 3/8”).
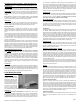
Underlayment floor panels must be installed sealed side down. When used as a sub-
floor, allow 1/8″ (3 mm) expansion space between each panel. If spacing is
inadequate, cut in with a circular saw. Do not cut in expansion space on tongue and
groove panels. When installing parallel to the floor joists it may be necessary to
increase rigidity of the structural sub-floor system by installing an additional minimum
of 3/8″ (9.5 mm) approved underlayment floor panel.
Page 2
Performance Core T&G Installation Instructions 071015