
Installation Guide


Installation Instructions
For 3/8”, 1/2”, and 9/16” Wood floors with Enhanced Engineered Construction
™
©2019 mohawkflooring.com | 800.833.6954 | 0163DM | 03/2019 | Page 13/16MOHAWK TECHNICAL SERVICES DEPARTMENT | 508 EAS T MORRIS S TREET, DALTON, GA. 30721 | 888.387.9881
Floating Installation (Preparation)
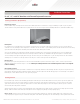
Undercut Door Casings
Undercut all door casings 1/16" higher than the thickness of the flooring materials to be installed. Use a scrap piece of flooring as a guide. Lay the scrap on the
substrate and cut the casing with a handsaw or use a power jamb saw set at the correct height. Remove all moldings and wall-base, and undercut all door casings.
Underlayment
Use Performance Accessory Underlayments or equivalent with equal or better specifications. Underlayment requirements are very critical to a floating
installation. Excessive pad compression or compaction is a common cause of seam failure. Lay the underlayment on the floor with the moisture barrier facing
up. The direction of the underlayment should be parallel to the direction of the flooring to be installed.
For the first row of flooring, the underlayment should be placed so that approximately 1" overlaps onto all perpendicular walls. Place the following row
next to the first row on top of the lower moisture barrier overlap. Remove the adhesive strip and fold back the upper overlap on the second row. Make
sure the underlayment fits together tightly; don’t leave gaps. On the last row, place the underlayment 1” up the wall. To join rolls on the short side of the
underlayment, use a moisture resistant tape to connect the two pieces so water cannot penetrate the underlayment.
Expansion Space
An expansion space equal to the plank thickness must be maintained around the perimeter of the room, all pipes, counters, cabinets, fireplace hearths,
doorframes and any other fixed vertical objects in the room. Doorway or archways 48 inches or less and rooms larger than a 26' x 33' are required
to have a T-molding.
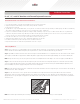
Glue and Glue Placement
The recommended glue for floating installation is Performance Accessory Tongue & Groove D3 Rated Floating Floor Glue. The glue must be placed on every
plank along the topside of the groove and bottom side of the tongue for the full length of the side and end. Apply only a 3/32" bead of glue. If the groove is
filled with glue, it will be difficult to close the seam, preventing a tight fit.
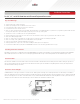
Getting Started
The installation begins with three rows of flooring glued together and held in place with low adhesion delicate surface painters tape with the groove side
facing the wall. Spacers must be used to establish the expansion space from the walls equal to the plank thickness. These three rows must be straight,
square and in rack because they establish the alignment of the rest of the floor. After putting these three rows together, allow the glue to set 15 to 45
minutes before proceeding with the installation.
With the tongue facing out, the planks can be tapped together with a tapping block on the tongue to make a snug fit. After installing eight or ten rows of
flooring, stand back and check for crowning or heaving due to tension strapping or any damage caused by improper taping.
Clean as you go: If any glue squeezes out of the seam between the planks allow it to dry for 10 to 15 minutes and then lightly scrape it away with a plastic
scraper or putty knife, any glue left may be cleaned with a damp cloth. Do not allow the glue to dry on the face of the flooring; it will be very difficult to clean off.