
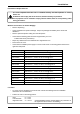
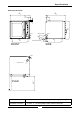
Specifications

Operation
7
Baking
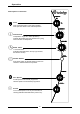
1. Turn Power 'On'
The indicator light will illuminate whenever the switch is in the “I” (On) position (the oven
lights will also illuminate).
The oven fan will start after 10 seconds with the door closed. The fan delay will repeat when-
ever the door is closed after opening.
The oven fan will change rotation direction every 90 seconds.
2. Fan Speed
The oven fan can either be operated at “HI” fan speed or “LO” speed by rotating the knob.
This maybe done before or during a cooking cycle.
For most applications the HI fan speed provides best results. For delicate baked products or
roasting the LO fan speed may be more suitable.
3. Oven Vent
The oven vent can be opened or closed at any stage during a cooking cycle in the oven.
For best steam results on baked product always ensure the oven vent is closed.
The oven vent combines an over pressure feature that allows the vent to open automatically
when required for periods when steam injection is used, to relieve excess pressure.
4. Set Thermostat to Desired Cooking Temperature
The thermostat indicator light will illuminate when ever the elements are cycled on to maintain
set temperature.
5. Load Oven
Once the oven is up to temperature, open the door and load the oven with product. Avoid
delays in loading the oven with the door open as this will delay oven temperature recovery.
The ovens fan will stop when the door is opened. The fan will start 10 seconds after the door
is closed.
6. Steam
When steam is required press the steam button. Steam will be injected into the oven
chamber for as long as the steam button is held pressed.
7. Set Timer to Desired Time.
To set timer, turn knob clockwise to the required time. At any stage, the time can be adjusted
in either direction.
For settings less than 10min, first set to greater setting, then turn down to required time
period.
This 60 minute timer is completely independent of the oven control.