Instruction Booklet Electric Oven MSS 601
Thank you for selecting our appliance We wish you lots of enjoyment with your new appliance and we hope that you will consider our brand again when purchasing household appliances. Please read this user manual carefully and keep it throughout the product life cycle as a reference document. The user manual should be passed on to any future owner of the appliance.
Important Safety Information You MUST read these warnings carefully before installing or using the oven. If you need assistance, contact our Customer Care Department on 08705 950 950. Installation • This oven must be installed by qualified personnel to the relevant British Standards. • This oven is heavy. Take care when moving it. • Remove all packaging, both inside and outside the oven, before using the oven.
Contents For the Installer For the User Important Safety Information Description of the Oven 2 5 Technical Data Electrical Connection 13 14 Before the First Use 5 Building In 15 Controls 6 Using the Oven 7 Cleaning the Oven 10 Something not Working 12 Service and Spare Parts 16 Guarantee Conditions 17 European Guarantee 18 Guide to Use the Instructions The following symbols will be found in the text to guide you throughout the Instructions: Safety Instructions ) Step by step instruc
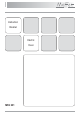
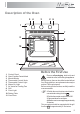
Description of the Oven 5 4 3 2 6 1 7 8 9 10 11 1. Control Panel 2. Oven Function Control Knob 3. Minute Minder 4. Thermostat Control Knob 5. Thermostat Control Light 6. Mains On Light 7. Air Vents for Cooling Fan 8. Grill 9. Oven Light 10. Rating Plate 11. Oven Door Before the First Use Remove all packaging, both inside and outside the oven, before using the appliance. Before first use, the oven should be heated without food. During this time, an unpleasant odour may be emitted.
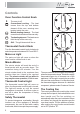
Controls Oven Function Control Knob 0 The oven is off. Conventional cooking - The heat comes from the top and bottom element of the oven, ensuring even heating inside the oven. Bottom heating element - The heat comes from the bottom of the oven only. Top heating element - The heat comes from the top of the oven only. Grill - The grill element will be on. Thermostat Control Knob Turn the thermostat control knob clockwise to select temperatures between 50°C and 250°C.
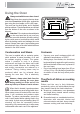
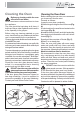
Using the Oven Always cook with the oven door closed. Stand clear when opening the drop down oven door. Do not allow it to fall open - support the door using the door handle, until it is fully open. The oven has four shelf levels, and is supplied with two shelves. The shelf positions are counted from the bottom of the oven as shown in the diagram.
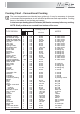
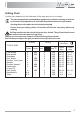
Cooking Chart - Conventional Cooking The oven temperatures are intended as a guide only. It may be necessary to increase or decrease the temperatures to suit individual preferences and requirements. Cooking times in the tables do not include pre-heating. A short oven pre-heating (about 10 minutes) will then be necessary before any cooking. NOTE: Shelf positions are counted from bottom of the oven.
Grilling Chart Cooking time depends on the thickness of the meat and not on its weight. The oven temperatures are intended as a guide only. It may be necessary to increase or decrease the temperatures to suit individual preferences and requirements. Cooking times in the tables do not include pre-heating. A short oven pre-heating (about 10 minutes) will then be necessary before any cooking. Grilling must be carried out with the oven door closed.
Cleaning the Oven Before any cleaning switch the oven off and let it cool down. Never use steam or steam machines to clean the appliance. The oven should be kept clean at all times. A build-up of fats or other foodstuffs could result in a fire, especially in the grill pan. Before using any cleaning materials on your oven, check that they are suitable and that their use is recommended by the manufacturer. Cleaners that contain bleach and harsh abrasives should NOT be used.
Replacing The Oven Light Disconnect the appliance. If the oven bulb needs replacing, it must comply with the following specifications: Electric power: 15 W/25 W; Electric rate: 230 V (50 Hz); Resistant to temperatures of 300°C; Connection type: E14. These bulbs are available from your local Service Force Centre. To replace the faulty bulb: 1. Ensure the oven is disconnected from the electrical supply. 2. Turn the glass cover counterclockwise. 3. Remove the faulty bulb and replace with the new one. 4.
Something not Working If the appliance is not working correctly, please carry out the following checks, before contacting your local Service Force Centre. IMPORTANT: If you call out an engineer to a fault listed below, or to repair a fault caused by incorrect use or installation, a charge will be made even if the appliance is under guarantee. SYMPTOM The oven does not come on SOLUTION Check that both a cooking function and temperature have been selected.
Technical Data The oven must be installed according to the instructions supplied. This oven must be installed by qualified personnel. Moffat MSS 601 A Heating element ratings Top element Bottom element Top+Bottom (total) Grill element Oven Light Cooling Fan Total Rating 800 W 1,000 W 1,800 W 1,650 W 25 W 25 W 1,850 W 0,79 kW/h 56,0 Dimensions of the oven cavity Height Width Depth Oven capacity: 335 mm 405 mm 410 mm 56 litres 43 min. 1130 cm2 This appliance complies with the following E.E.C.
Electrical Connection The oven is designed to be connected to 230 V (50 Hz) electricity supply. The oven has an easily accessible terminal block which is marked as follows: Letter L Letter N or E - Live terminal Neutral terminal - Earth terminal THIS OVEN MUST BE EARTHED For UK use only Connection via Min. size Cable / flex Cable/flex type 13 A socket outlet 2.5 mm2 3 core butyl insulated 2.5 mm2 PVC/PVC twin and earth 13 A spur box Oven Control Circuit Fuse 13 A min. 15 A min. 20 A max.
Building In Please ensure that when the oven is installed it is easily accessible for the engineer in the event of a breakdown. The surround or cabinet into which the oven will be built must comply with these specifications: z the dimensions must be as shown in the relevant diagrams; z the materials must withstand a temperature increase of at least 50°C the above temperature; z proper arrangements must be made for a continuous supply of air to the oven to prevent the oven overheating.
Service and Spare Parts If after the checks listed in the chapter "Something not working", the appliance still does not work correctly, contact your local Service Centre, specifying the type of malfunctioning, the appliance model (Mod.), the product number (Prod. No.) and the serial number (Ser. No.) marked on the identification plate. This plate is placed on the front external edge of the oven cavity.
Guarantee/Customer Service Standard Guarantee Conditions We, Electrolux, undertake that if within 12 months of the date of the purchase this Electrolux appliance or any part thereof is proved to be defective by reason only of faulty workmanship or materials, we will, at our option repair or replace the same FREE OF CHARGE for labour, materials or carriage on condition that: • • • • • • The appliance has been correctly installed and used only on the electricity supply stated on the rating plate.
Customer Care For general enquiries concerning your Electrolux appliance, or for further information on Electrolux products please contact our Customer Care Department by letter or telephone at the address below or visit our website at www.electrolux.co.
35698-0101 10/07 R.