35668-7801 BUILT-IN OVEN MODEL MS 65 OPERATING AND INSTALLATION MANUAL 2
Important Safety Information These warnings are provided in the interest of safety. You MUST read them carefully before installing or using the appliance. Your safety is of paramount importance. If you are unsure about any of the meanings of these WARNINGS, contact the Customer Care Department Installation • The oven must be installed according to the instructions supplied. Any electrical work must be undertaken by a qualified electrician/competent person.
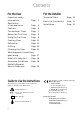
Contents For the User For the Installer Important safety information Technical Data Page 21 Page 3 Electrical Connection Page 21 Description of the appliance Page 5 Installation Page 22 Controls Page 6 The Analogic Timer Page 7 Before the First Use Page 9 Using the Fan Oven Page 9 Cooking Chart Page 11 Defrosting Page 13 Grilling Page 14 Cleaning the Oven Page 15 What happens if something goes wrong Page 17 Help Us to Help You Page 18 Guarantee Conditions Page 18 Moffat
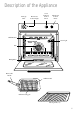
Description of the Appliance Analogic timer 11 12 Thermostat Control Light Oven Function Control Knob Thermostat Control Knob 1 2 10 0 START 3 8 4 7 6 CLOCK 5 COOKING TIME Grill Element Oven Light Fan Rating Plate Removable handle Grill Pan Grid Grill / Roasting pan Anti-tip shelf (x 2) 5
Controls OFF Oven Function Control Knob Oven Light - The oven light would be on without any heat. Defrost Setting - This setting is intended to assist in thawing of frozen food (see page 13). 0 Oven Light Grill Fan ducted cooking - This allows you to roast or roast and bake simoultaneously using any shelf, without flavour transference. Fan Ducted Cooking Grill - The heat comes only from the top element.
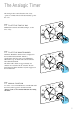
The Analogic Timer The analogic timer can indicate the time of day, operate as a minute minder and automatically operate the oven. ☞ TO SET THE TIME OF DAY Pull knob B outwards and while turning it, set the time of day. 12 1 11 T STAR 2 10 3 K CLOC 4 8 5 7 6 IME ING T COOK ☞ TO SET THE MINUTE MINDER Turn knob B until the duration time is displayed in the left hand dial (maximum 180 min.). Our diagram shows the timer set for 60 minutes.
☞ TO SET THE TIMER TO SWITCH OFF ONLY This is useful if you want to begin cooking immediately but have the oven switch off automatically. 1. Set the oven function control knob and the thermostat control knob on the required settings. 2. Place food in the oven. 3. Turn knob B until the duration time is displayed in the left hand dial (maximum 180 min.). Our diagram shows the timer set for 40 minutes. 4. Press in knob A and turn the green pointer until it reaches exactly the current time.
Before the First Use Remove all packaging, both inside and outside the oven, before using the appliance. Before first use, the oven should be heated without food. During this time, an unpleasant odour may be emitted. This is quite normal. ☞ 1. Set the electronic timer to manual function. 2. Switch the oven function control knob to fan cooking . 3. Set the thermostat control knob to MAX. 4. Open a window for ventilation. 5. Allow the oven to run empty for approximately 45 minutes.
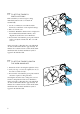
The oven has four shelf levels, and is supplied with two anti-tip shelves. It is important that these shelves are correctly positioned as shown in the diagram. 4 3 ☞ How to Use the Fan Oven 2 1. Turn the oven function control knob to . 2. Turn the thermostat control to the required temperature. THINGS TO NOTE • The oven light will come on when the oven function control knob is set. • The oven fan will operate continually during cooking.
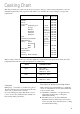
Cooking Chart This chart is intended as a guide only. It may be necessary to increase or decrease the temperature to suit your individual requirements. Only experience will enable you to determine the correct setting for your personal requirements.
i Hints and Tips Runner positions are not critical, but make sure the shelves are evenly spread. When cooking more than one dish in the fan oven, place dishes centrally on the shelves rather than several dishes on one shelf. When the oven is full, you may need to allow slightly longer cooking time. A shelf may be placed on the floor of the oven. Place dishes on a shelf in this position rather than on the oven base, to allow air circulation around the food. When the oven is full of the same food, e.g.
Defrosting i Hints and Tips The oven fan operates without heat and circulates the air, at room temperature, inside the oven. This increases the speed of defrosting. However, please note that the temperature of the kitchen will influence the speed of defrosting. This function is particularly suitable for delicate food which could be damaged by heat, e.g. cream filled gateaux, iced cakes, pastries, bread and other yeast products.
Grilling Grilling must be carried out with the oven door closed. The grill pan handle must be removed from the pan. ☞ How to Use the Grill 1. Turn the oven control function knob on COOKING CHART Cooking time depends on the thickness of the meat and not on its weight. Type of food . 2. Turn the thermostat control knob on the required temperature. 3. Adjust the grid and grill pan runner position to allow for different thicknesses of food.
Cleaning the Oven Always switch off at the electricity supply before any cleaning. The oven should be kept clean at all times. A build-up of fats or other foodstuffs could result in a fire, especially in the grill pan. Cleaning materials Before using any cleaning materials on your oven, check that they are suitable and that their use is recommended by the manufacturer. Cleaners that contain bleach should NOT be used as they may dull the surface finishes. Harsh abrasives should also be avoided.
Oven Cavity The enamelled oven cavity is best cleaned whilst the oven is still warm. Wipe the oven over with a soft cloth soaked in warm soapy water after each use. From time to time it will be necessary to do a more thorough cleaning, using a proprietary oven cleaner. Oven Shelves To clean the oven shelves, soak in warm soapy water and remove stubborn marks with a well wetted soap impregnated pad. Rinse well and dry with a soft cloth.
If something goes wrong If the appliance is not working correctly, please carry out the following checks, before contacting your local Zanussi Service Centre. SYMPTOM ■ The oven does not come on SOLUTION ◆ Check the oven is in manual operation and that both a cooking function and temperature have been selected. ◆ Check the appliance is wired in properly, and the socket switch or the switch from the mains supply to the oven are ON.
Help us to help you In the event of your appliance requiring service Telephone numbers are detailed on the list headed “Moffat Service Centre”. When booking a service call we will need to know the model number and date of purchase, together with your name, address with postcode (service areas are defined by the postcode), telephone number, and what appears to be wrong.
Moffat Aftersales Service Postocode to Service Centre Cross Reference Postcode Telephone AB AL B1-48, 62-79 B90-94 B49, 50, 60 61, 80, 95-98 BA BB BD BH BL BN1-18, 20-27 BR BS BT1-30, 36-57 BT63-67 BT31-35, 60-62 BT68-82, 92-94 CA CB CF CH CM CO CR CT CV CW DA DD DE DG DH 01224-696569 Aberdeen 0181-965 9699 Canvey DL DN1-7,10-12 DN8-9,15-20 DN21 Subcodes 3,4 DN31-40 DN14 DN21 Subcodes 1,2,5 DT Dundee Gas Only DY E EC EH EN EX1-17 EX18-23 EX31-39 FK FY G GL GU1-35 Guernsey Service Centre 0121-3587076 N
Moffat Aftersales Service Addresses CENTRE ADDRESS ABERDEEN Moffat Aftersales Service Northeast Appliance Service 8 Cornhill Arcade Cornhill Drive Aberdeen AB2 5UT ARGYLL Moffat Aftersales Service T.D.C. Refrigeration Briar Hill 7 Hill Street, Dunoon Argyll PA23 7AL BARNSTAPLE BORDERS BRISTOL CANVEY CARDIFF Moffat Aftersales Service Mc Bain Refrigeration P.O.
Technical Data DIMENSIONS OF RECESS Height Width Depth 580 mm. 560-570 mm. 550 mm. DIMENSIONS OF THE OVEN CAVITY Height Width Depth Oven capacity 320 mm. 420 mm. 390 mm. 53.2 litres Heating elements rating Oven element Grill element Convection Fan Oven Light Total Rating 2.5 kW 1.8 kW 30 W 15 W 2.545 kW Electrical Connection We strongly recommend that all operations for the installation of your cooker be carried out by QUALIFIED PERSONNEL to the relevant British Standards.
Installation The oven must be installed according to the instructions supplied. Any electrical work must be undertaken by a qualified electrician/competent person, in accordance with existing rules and regulations. It is dangerous to alter the specifications or modify the appliance in any way. Please ensure that when the appliance is installed it is easily accessible for the engineer in the event of a breakdown.