User Manual - Mode D'Emploi - Bedienungsanleitung - Gebruiksaanwijzing Istruzioni per L'Uso - Manual de Manejo - Manual de Instruções MULTI BUILT-IN OVENS FOURS MULTIFONCTIONS MULTIFUNKTION EINBAU-HERDE MEER-SYSTEMEN INBOUW-FORNUIZEN FORNI DA INCASSO MULTIFUNZIONE HORNOS EMPOTRADOS MULTI FORNOS MULTI-FUNÇÕES 1
FRONT PANEL BANDEAU DE COMMANDE SCHALTERBLENDE BEDIENINGSPANEEL PANNELLO DEI COMANDI PANEL DE MANDOS PAINEL DE COMANDOS MOD. BMS 641 W - BMS 641 N - BMS 641 Y - BMS 641 A - BST 6 W - BST 6 N - BST 6 Y - BST 6 A 1 2 3 4 °C °C - + MOD.
0 FO 0799 FO 0027 Fig. 5 Fig. 9 50 Fig. 1 100 MAX 20 0 150 FO O781 Fig. 6 Fig. 2 Fig. 10 A U T O - + FO 0438 FO O778 FO 0336 Fig. 3 Fig. 7 FO 0018 FO 0288 FO 0350 Fig. 4 Fig. 11 Fig. 8 Fig.
FO 0287 FO 0292 Fig. 13 Fig. 17 Mod. PROD. NO. SER. NO. MOD. PROD. NO. TYPE SER. NO. FO 0039 Fig. 14 Fig. 18 FO 0986 FO 0414 Fig. 15 FO 0290 4 Fig. 19 FO 2159 Fig. 16 Fig.
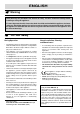
ENGLISH ☛ Warning These warnings are provided in the interest of safety. You installing or using the appliance. MUST read them carefully before It is most important that this instruction book should be retained with the appliance for future reference. Should the appliance be sold or transferred, always ensure that the book is left with the appliance in order that the new owner can get to know the functions of the appliance and the relevant warnings.
Contents 1. The Front Panel ............................ Page 2. How to Set the Programmer ........ Page 3. When the Oven is First Installed ................................ Page 4. Using the Oven ............................. Page The shelf positions ...................... Page Conventional cooking ................. Page The Fan Oven ............................. Page Defrosting ................................... Page Warnings, hints and tips ............. Page 5. Cooking Tables ..........................
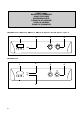
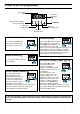
2. How to set the programmer Program On Light Automatic Operation Light A U T O - + A button: Minute Minder Acoustic Signal Off KNOB (E) B C D E B button: Cooking Time D button: Manual Operation C button: End of Cooking SETTING THE TIME OF DAY (24 H CLOCK) Press buttons A and B at the same time and while turning knob E enter the time of day. COOKING TIME A U T O - + Press button B and while turning knob E enter the required time.
3. When the oven is first installed Once the oven has been installed: a) set the thermostat knob to MAX; b) switch the oven function control knob to conventional cooking ( ); c) allow the oven to run empty for approximately 45 minutes; d) open a window for ventilation. During this time, an unpleasant odour may be emitted. This is absolutely normal, and is caused by residues of manufacturing.
Hints and Tips on Cooking Fish and Meat You can place meat in oven proof dishes, or directly on the oven shelf. In this case, remember to place the dripping pan in the first position from the bottom (see Fig. 7) with some water in it. The dripping pan will avoid the falling of melted fat on the oven base. White meat, poultry and fish in general, need a medium temperature cooking (between 150 and 175 ° C).
GRILLING Cooking time (minutes) Grilling Quantity TYPE OF DISH PIECES WEIGHT 4 3 2 1 Level temp.
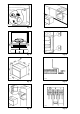
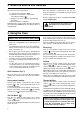
The Hinged Grill Replacing the Oven Light This model has been fitted with a hinged grill element, to enable you to clean the roof of the oven easily. Before proceeding, ensure the oven is isolated from the electricity supply. Then undo the screw which holds the grill in place. (see Fig. 10) Gently pull the grill downward to allow access to the oven roof. (see Fig. 11). Clean the oven roof with a suitable cleaner and wipe dry before replacing the hinged grill element.
8. Techical Assistance and Spare Parts If after the checks listed in the previous chapter, the appliance still does not work correctly, contact your locals Zanussi Service Centre, specifying the type of malfunctioning, the appliance model (Mod.), the product number (Prod. No.) and the serial number (Ser. No.) marked on the identification plate. This plate is placed on the front external edge of the oven cavity, as indicated in Fig. 14.
11. Installation Building In Electric Connection It is important that the dimensions and materials of the surround or cabinet into which the oven will be built are correct and will withstand a temperature increase. A correct installation will have to ensure a proper protection against contact with electric parts or merely functionally isolated parts. All the units meant to ensure protection have to be fitted not to be taken away without using any tool.