OPERATING & INSTALLATION INSTRUCTIONS BUILT UNDER OVEN MDB700
TECHNICAL DETAILS MODEL NO. MDB700 Voltage: 230/240 Volts AC 50Hz Wattage: 3.8/4.1kW Height: 720mm Width: 600mm Depth: 598mm Weight: 50kg This appliance complies with: European Council Directive 73/23/EEC. EMC Directive 89/336/EEC. CE Marking Directive 93/68/EEC.
CONTENTS Technical Details .................................................................................................................................... Contents ................................................................................................................................................. 2 3 Safety ...................................................................................................................................................... Before Installation .............
CONTENTS Defrost Feature ...................................................................................................................................... Uses of Defrost Feature ................................................................................................................. Selecting Defrost ............................................................................................................................ Things to Note .......................................................
SAFETY THESE WARNINGS ARE PROVIDED IN THE INTERESTS OF YOUR SAFETY. ENSURE THAT YOU UNDERSTAND THEM ALL BEFORE INSTALLING OR USING THE APPLIANCE. DURING OPERATION Do not use this appliance if it is in contact with water. Never operate it with wet hands. This appliance is designed to be operated by adults. Young children must not be allowed to tamper with the appliance or play with the controls. PLEASE READ CAREFULLY During use the appliance becomes Hot.
Do not leave the grill pan handle in position when grilling as it will become hot. Do not leave utensils containing foodstuffs, e.g. fat or oil in or on the appliance in case it is inadvertently switched on. Always use oven gloves to withdraw the grill pan, when grilling. Follow the recommendations on page 16. Cookers and hobs become very hot, and retain their heat for a long period of time after use. Children should be kept well away from the appliance until it has cooled.
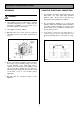
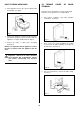
INSTALLATION INSTRUCTIONS WARNINGS CHOICE OF ELECTRICAL CONNECTION • WARNINGS: • • • • This appliance must be installed by a qualified electrician/competent person. Safety may be impaired if installation is not carried out in accordance with these instructions. This appliance must be earthed. • Do not remove the screws from the earth tab extending from the oven mains terminal block (Fig. 1). Fig.
INSTALLATION INSTRUCTIONS NOTE: It is good practice to : • • Fit an Earth Leakage Circuit Breaker to your house wiring. Wire your appliance to the latest IEE regulations. THINGS TO NOTE • • • • • • • This appliance is designed to be fitted between cabinets with the recommended dimensions as shown in Fig. 3 & 4. If there is an existing housing unit it must be removed. The dimensions given provide adequate air circulation around the unit within the cabinet, ensuring compliance with BS EN60-335. Fig.
INSTALLATION INSTRUCTIONS PREPARING CABINET FOR FITTING OVEN • • • • • • • Make sure the space between the cabinets is the correct size for the appliance to be fitted (Ref. Fig. 5 & 6). The plinth board spanning the space into which the appliance is to be installed should be removed. If the size between adjacent cabinets is 605610mm, then the cabinets should be modified so that the recommended dimension of at least 600605mm is maintained.
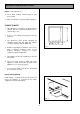
HOW TO FINISH UNPACKING • TO REMOVE TERMINAL COVER OF MAINS Place appliance next to the space in which it will be installed. See Fig 8. From the rear of the appliance, remove mains input terminal cover to gain access to terminal block. • First remove retaining screw with pozidrive screwdriver. See Fig. 9. Fig. 8 • • Remove the appliance packing except for bottom tray which should be left in position until the appliance is ready to be fitted into its cabinet. Fig.
INSTALLATION INSTRUCTIONS CONNECTING TO THE MAINS TERMINAL CHECKING ELECTRICAL CONNECTIONS • Warning: This appliance must be earthed. • • Confirm the appliance is correctly connected by switching on and observing the various oven functions indicators. 2 We recommend you use a new length of 6mm twin core and earthed cable to ensure your safety. CONNECTING TO A HOB OR COOKER POINT Make connection as shown in Fig.
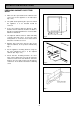
INSTALLATION INSTRUCTIONS • FITTING INTO THE SPACE BETWEEN CABINETS IMPORTANT: Ensure that the oven is switched off at the wall before any further work is carried out. • When the appliance is fully housed, screw the stability screws (supplied with the appliance) into the underside of the worksurface in the positions indicated (see Fig. 14), taking care not to distort the trim. It is advisable to turn each screw alternatively to avoid damaging the trim. Ensure the appliance is in front of the cabinet.
INTRODUCTION The Control Panel Timer Grill Control Fan Oven Indicator Neon Fan Oven Temperature Control 13
INTRODUCTION WARNING: THIS APPLIANCE MUST BE EARTHED THE COOLING FAN FOR THE CONTROLS The cooling fan operates immediately when the grill is switched on and after a period of time when the oven is switched on. It may run on after the controls are switched off until the appliance has cooled. RATING PLATE This is situated on the front frame of the appliance and can be seen upon opening the top cavity door. Alternatively the rating plate may also be found on the back or top of some models (where applicable).
GRILL AND OVEN FURNITURE The following items of oven furniture have been supplied with the appliance.
THE GRILL THE GRILL PAN AND HANDLE The grill pan has a removable handle. WARNING – Accessible parts become hot when the grill is in use. Keep children away. To insert the handle, press the button on the handle slightly upwards inserting the lip into the widest part of the bracket. Move the handle towards the left, lower into position and release the button. USES OF THE GRILL The grill is situated in the top compartment. The grill gives variable heat settings.
• The grill pan must not be located in the shelf runners. Food should be thoroughly dried before grilling to minimise splashing. Brush lean meats and fish lightly with a little oil or melted butter to keep them moist during cooking. To check the progress of the food being grilled, the grill pan should be withdrawn on the shelf to attend to food during cooking. Ensure that you support the grill pan when it is withdrawn.
GRILLING CHART The chart below gives recommended cooking times and shelf positions. Remember that these are a guide and should be adjusted to suit personal taste. Note: Shelf positions are counted from the bottom upwards.
THE FAN OVEN USES OF THE FAN OVEN THINGS TO NOTE The Fan oven is particularly suitable for cooking larger quantities of food, or for weekend or celebration meals. • The advantages of Fan oven cooking are: PREHEATING • The Fan oven quickly reaches its temperature so it is not usually necessary to preheat the oven. Without preheating however you may need to add an extra 5 – 10 minutes on the recommended cooking times. For recipes needing high temperatures e.g. bread, pastries, scones, soufflés etc.
HINTS AND TIPS • • • • • • Arrange the shelves in the required positions before switching the oven on. Shelf positions are counted from the bottom upwards. When cooking more than one dish in the fan oven, place dishes centrally on different shelves rather than cluster several dishes on one shelf, this will allow the heat to circulate freely for the best cooking results. It is recommended that when baking larger quantities, the shelf positions should be evenly spaced to suit the load being cooked.
FAN OVEN COOKING CHART The oven temperatures are intended as a guide only. It may be necessary to increase or decrease the temperatures by a further 10°C to suit individual preferences and requirements. Note: Shelf positions are counted from the bottom of the oven.
ROASTING CHART ROASTING CHART INTERNAL TEMPERATURES – Rare : 50-60°C, Medium : 60-70°C, Well done : 70-80°C MEAT FAN OVEN COOKING TIME 20-35 minutes per ½kg (1lb) and 20-35 minutes over Beef 160 – 180°C Beef, boned 160 – 180°C 25-35 minutes per ½kg (1lb) and 25-35 minutes over Mutton and Lamb 160 – 180°C 25-35 minutes per ½kg (1lb) and 25-35 minutes over Pork and Veal 160 – 180°C 30-40 minutes per ½kg (1lb) and 30-40 minutes over Ham 160 – 180°C 30-40 minutes per ½kg (1lb) and 30-40 minutes
DEFROST FEATURE USES OF DEFROST FEATURE • This fan oven function enables you to defrost most foods without heat faster than some conventional methods as the oven fan circulates air around the food. It is particularly suitable for delicate frozen foods which are to be served cold e.g. cream filled gateaux, cakes covered with icings or frostings, cheesecakes, biscuits, scones, etc. • The actual speed of defrosting is influenced by room temperature.
CARE AND CLEANING CLEANING THE OUTER AND INNER DOOR GLASS PANELS BEFORE CLEANING THE APPLIANCE, ALWAYS ALLOW THE COOLING FAN TO COOL THE APPLIANCE DOWN BEFORE SWITCHING OFF THE ELECTRICITY SUPPLY. To prevent damaging or weakening of the door glass panels avoid the use of the following: CLEANING MATERIALS • Household detergents and bleaches Before using any cleaning materials on your appliance, check that they are suitable and that their use is recommended by the manufacturer.
During normal use the Stayclean coating will become splashed with fats and food residues. By running the oven without food, the Stayclean surfaces burn off any soilage. If the door glass panel becomes chipped or has deep scratches the glass will be weakened and must be replaced to prevent the possibility of the panel shattering. Please contact your local Service Force Centre who will be pleased to advise further.
COOKING TO REDUCE SOILAGE • • • • Cook at the recommended temperatures. Higher temperatures during roasting will increase soilage. Try cooking at lower temperature for an increased length of time, you will save energy and often the joint is more tender. Use minimal, if any, extra oil or fat when roasting meat, potatoes only require brushing with fat before cooking. Extra fat in the oven during roasting will increase splashing and soilage. It is NOT necessary to add water to a meat tin when roasting.
SOMETHING NOT WORKING? The oven temperature is too high or too low: Before calling an Engineer please carry out the following checks, you may be able to solve the problem without the expense of an Engineer. * Check that the recommended temperatures are being used (see page 21). Be prepared to adjust the temperature up or down by 10°C to achieve the results you want.
SERVICE AND SPARE PARTS In the event of your appliance requiring service, or if you wish to purchase spare parts, please contact your local Service Force Centre by telephoning:- 0870 5 929929 Your telephone call will be automatically routed to the Service Force Centre covering your post code area. For the address of your local Service Force Centre and further information about Service Force, please visit the website at www.serviceforce.co.uk.
GUARANTEE CONDITIONS NOTES Standard guarantee conditions We, Moffat, undertake that if within 12 months of the date of the purchase this Moffat appliance or any part thereof is proved to be defective by reason only of faulty workmanship or materials, we will, at our option repair or replace the same FREE OF CHARGE for labour, materials or carriage on condition that: • • • • • • The appliance has been correctly installed and used only on the electricity supply stated on the rating plate.
NOTES 30
NOTES 31
Moffat, 55-77 High Street, Slough, Berkshire SL1 1DZ Consumer care telephone number 08705 950950 IMPORTANT NOTICE In line with our continuing policy of research and development, we reserve the right to alter models and specifications without prior notice. This instruction booklet is accurate at the date of printing, but will be superseded if specifications or appearance are changed.