
Installation Instructions


7
CUTTING & TRIMMING
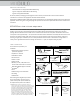
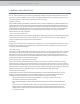
Stones can be cut and shaped for fit. Use wide-mouth nippers or a hatchet
(Fig. 3 & 4). (Refer to page 5, Tools Required section.) Some broken stones
may be found in the box. These also may be used in filling gaps between
large stones. For best finished appearance, coat cut or broken edges with
mortar. If possible, position cut edges up when they are above eye level,
down when below eye level. Placing a cut edge next to a thick/larger stone
will also help conceal the cut.
Safety glasses and a dust mask
(1)
should always be worn when cutting
any Modulo Stone product.
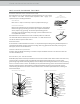
MORTAR & WEATHER CONDITIONS
If stone is being applied in hot or dry weather, the back of each piece should be moistened with a fine spray of water or a
wet brush to adequately prevent excessive absorption of moisture from the mortar. If being installed over concrete,
masonry or scratch coat substrate, the substrate surface area should also be dampened before applying mortar. Surfaces
should appear damp but free of surface water. Applications should be protected from temperatures below 40°F as
mortar will not cure properly under such conditions. See ASTM C1780 for Hot & Cold Weather Requirements.
If using a modified mortar, follow mortar manufacturer’s recommendations regarding wetting of stone
and scratch coat.
STEP SIX:
GROUTING & FINISHING JOINTS
GROUTING JOINTS
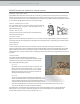
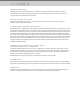
When additional mortar is required, use a grout bag to fill in joints completely. Care must be taken to avoid smearing mortar
on surface of stone. Accidental smears or mortar droppings should be removed only after mortar has become crumbly using a
whisk broom or dry bristle brush. Never use a wet brush or wire brush.
FINISHING JOINTS
When the mortar joints have become firm or “thumb-print” dry
(setting time will vary depending on wall surface and climatic
conditions), they should be pointed up with a wood stick or metal
jointing tool. Rake out excess mortar, compact and seal edges
around stones (Fig. 6). Careful attention to proper and even jointing
will result in a professional looking finish.
.
FIG. 5
GROUT JOINTS
FIG. 6
FINISHING THE JOB
FIG. 3
TRIM WITH
WIDEMOUTH NIPPERS
FIG. 4
TRIM WITH A HATCHET
CLEANING FINISHED JOB
When the mortar is sufficiently set up, the finished job should be broomed or brushed to remove loose mortar and to clean
the face of the stone. A wet brush or sponge should never be used to treat the mortar joints as this will cause staining that will
be difficult, or impossible, to remove. Do not use acid or acid-based products.
MORTAR COLOR
Tinting mortar
complements the color of the stone being installed. Example: Use tan mortar with earth-tone stones. This will
greatly enhance the appearance of the finished installation. Regular mortars can be tinted to complement your Cultured Stone
product using iron oxide pigments available from your dealer.