
Installation Instructions


STONE INSTALLATION INSTRUCTIONS
STEP FIVE:
APPLICATION OF MODULO STONE UNITS
PREPARE YOUR WORK AREA
Spread Modulo Stone wall veneer out at the job site so you have a good variety of sizes, shapes and colors to choose from.
Plan for some variety and contrast in the overall design. Use small stones next to large ones, heavy-textured pieces next to
smooth, thick stones next to thinner ones. Mixing Modulo Stone wall veneer from different boxes during application will allow
you to achieve a desirable balance of stones on your finished project.
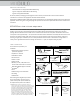
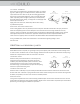
INSTALL CORNER PIECES FIRST
If your application requires corner pieces, apply these first. Notice that
the corner pieces have a long and a short leg. Alternate these in
opposite directions (Fig. 1).
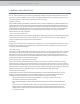
INSTALL FLAT PIECES
After the corner pieces are in place, flat pieces are applied working
toward the wall center (Fig. 2).
STARTING POINT
Apply mortar and stone working from the bottom up, or most stones can also be applied from the top down. Working from
the top down may help avoid splashing previously applied stone with dripping mortar. Ledgestone types should be installed
from the bottom up.
JOINT WIDTH
In order to obtain the most natural look, joints should be as narrow as possible. The average should not exceed ⁄" in
width. An attractive look can also be achieved by fitting stones tightly together if desired. If using tight fit/dry-stack method,
figure in additional stone material. It is important to make sure scratch coat/backing has been covered completely by the
setting bed of mortar. This will conceal the scratch coat/backing and prevent pockets from forming behind stones that could
trap water.
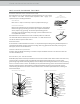
SETTING UNITS
Units shall be installed using Method A or Method B or a
combination of both to achieve setting bed with complete coverage
of the back of the unit and full contact between the mortar setting
bed, unit and prepared backing surface.
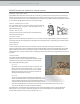
Method A
Back butter the unit, using sufficient mortar and pressure to fill
texture and voids in the back of unit. While ⁄" to ⁄" setting
bed mortar is wet, press and work the unit onto the prepared
backing with enough pressure to force mortar to squeeze out
around the entire perimeter of the unit.
Method B
The mortar setting bed shall be installed by trowel application ⁄" to ⁄" thick directly to the prepared
surface. Plus back butter the unit using sufficient mortar and pressure to fill texture on and voids in the back
of the unit. While the setting bed on the prepared backing surface is plastic, press and work the unit into the
setting bed with enough pressure to force mortar to squeeze out around the entire perimeter of the unit.
Limit mortar setting bed open time and work only an area that can be covered before the mortar skins over.
Time and area will depend on mortar and weather conditions.
Note: Method B is recommended for tight fit applications to ensure full setting bed of mortar. In tight fit applications,
before placing next unit, compact or remove the squeezed out mortar to allow adjoining unit to butt tightly. There
shall be mortar between the units but the joint will be less than /."
FIG. 1
FIG. 2