
Instructions/manual Easy Trainer 600


F
Manual MODSTER Easy Trainer 600
20 www.modster.at
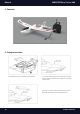
6. Before Starting
6.1 Flight Checklist
ATTENTION: This checklist is NOT a substitute for the exact passage of the contents in this manual! Although it can be used as a quick start
guide, we strongly recommend that you read the instructions carefully before use.
• Always switch on the transmitter rst
• Make sure the throttle stick is in the low position before the battery is connected.
• Let the model take o (by hand pushing or lifting o a at / at surface)
• Load the model on a at / at surface
• Remove the battery from the regulator
• Always switch the transmitter o
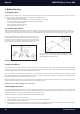
6.2 Suitable Flying Fields
Due to the size and weight of the model, it is seen as a "Parkyer". It is therefore recommended to y the model in a park, schoolyard or
other area that is large enough and that no persons or structures are in the way. We recommend an aireld size of at least one soccer eld.
The larger the area, the better, especially when ying is rst learned. DO NOT y on parking lots or areas where many people are located.
We also recommend ying over lawns, since in the event of a crash
less damage will occur on this surface. Short lawns are better suited
to take o or land, as long lawns can cause an overrun and damage
to the model can occur. An ideal aireld provides smooth surfaces for
launch and landing (for example, asap) and lawns to y over.
Fly on expansive surface without obstacles and bushes. Never y
the airplane close to a motorway, train tracks, power lines, people
gathering, ight or residential areas.
PLEASE NOTE: The plane should only be own outside!
6.3 Flying Conditions
Fly the model only on calm days without wind, especially when you are still learning to y. It is also strongly advised to y only under quiet
conditions, until you are familiar with the controllers and the handling of the model. Already weak winds can make the learning of ying
much more dicult and carry the aircraft even from your eld of view.
If you are a beginner, we recommend allowing a more experienced pilot to y the model and trim properly before attempting your rst
ight. A tested, yable and properly trimmed model is much easier and more comfortable to y! Please contact your local hobby shop and /
or model ying club to nd an experienced pilot in your area.
After properly trimming the aircraft in a quiet environment and being familiar with the handling / characteristics, you can y in light winds or
experience and self-assessment at wind speeds of up to 8-11 kilometers per hour.
DO NOT y on days of high humidity such as rain or snow.
6.4 Charging Instructions
To charge the supplied lithium battery, use only the supplied USB charging cable. Charging the lithium battery with a charger that is not
compatible with lithium batteries (such as a NiCd or NiMH battery charger) or another lithium battery charger with incorrect settings may
damage the battery or even cause property damage or personal injury to lead.
Follow the steps below to charge the lithium battery with the included charger.
1. Always unplug the battery from your plane
2. Carefully plug the charging cable into the USB port on your computer or USB adapter.
3. Connect the battery to the charging cable.
4. The charging process takes about 3.5 hours. For safety reasons, never charge the battery for longer than 4 hours. While charging, the
red LED indicator will be ashing. When the charging is nished, the red LED will be o.