MODSTER DASHER V2 Betriebsanleitung wild.rough.fast USER MANUAL /BETRIEBSANLEITUNG A N-2 6 5 0 6 1 www.modster.
Betriebsanleitung MODSTER DASHER V2 Inhaltsverzeichnis 1. Einleitung S.3 2. Hinweis zur Sicherheit S.3 3. Vor dem Start S.3 4. Produktinfo S.5 5. Lieferumfang S.5 6. Technische Daten S.5 7. Inbetriebnahme S.6 8. Wartung S.10 9. Regelmäßige Kontrollen S.10 10. Entsorgung S.11 11. Explosionsansicht S.12 12. Ersatzteile S.14 2 www.modster.
Betriebsanleitung MODSTER DASHER V2 1. Einleitung Sehr geehrter Kunde, sehr geehrte Kundin, wir freuen uns, dass Sie ein Produkt aus dem Hause MODSTER Racing gewählt haben. Alle Modelle werden vor der Auslieferung sorgfältig auf Vollständigkeit und Funktion geprüft. Aufgrund ständiger Weiterentwicklung und Verbesserung unserer Produkte behalten wir uns technische Änderungen sowie Änderungen in Ausstattung und Design ohne Ankündigung vor.
Betriebsanleitung • • • • • • • • • • • • • • • MODSTER DASHER V2 Bewahren Sie Batterien/Akkus außerhalb der Reichweite von Kindern und Haustieren auf, da diese die Batterien/Akkus versehentlich verschlucken können. Suchen Sie in diesem Fall umgehend einen Arzt auf! Ausgelaufene oder beschädigte Batterien/Akkus können bei Berührung Verätzungen verursachen. Falls Haut oder Augen mit dem Elektrolyten in Kontakt kommen, spülen Sie die Stelle sofort sorgfältig mit klarem Wasser und suchen Sie einen Arzt auf.
Betriebsanleitung MODSTER DASHER V2 LiPo-Balance-Ladegerät • Nach dem Anschluss des Laders an einer Steckdose (230V) leuchtet die LEDs grün (Ladegerät betriebsbereit). • Mit dem Anstecken des Akkus an der 2S bzw. 3S Buchse leuchtet die LEDs rot, der Ladevorgang läuft. • Ist der Akku voll, wenn nur noch die grünen LEDs leuchten, der Akku kann abgesteckt werden. • Das Ladegerät wird jetzt vom Netz getrennt. • Der Ladestrom liegt bei ca. 1 A. Ein LiPo Akku mit 3000 mAh hat somit eine Ladezeit von ca.
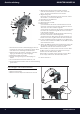
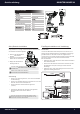
MODSTER DASHER V2 Betriebsanleitung 15 14 13 7. Wegeinstellung CH3: Bitte setzen Sie CH4 in die Mitte, bevor Sie die Taste CH3 EPA +/- drücken, dann drücken Sie EPA +/-. So können Sie den Winkel von ST einstellen 8. Wegeinstellung CH4: Bitte stellen Sie den CH4-Schalter auf links oder rechts, drücken Sie dann EPA +/- und stellen den Winkel ein 9. Batteriefach: Für [4] AA-Batterien 10. Schalter für Kanal 3 11. Multifunktionales rotes LED: 12.Kanalumpolung: (1).
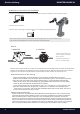
MODSTER DASHER V2 Betriebsanleitung SPEZIFIKATIONEN Teile-Nr. XC4R Konfiguration Pistolengriff z Kanäle 4 Eingangsspannung AA x4 Länge in mm 155.10 en Höhe in mm 193.70 Breite in mm 81.30 AU X 3 2 1 Akku/Batterie-Installation Empfänger-Installation und -Verbindung Wenn Sie AA-Batterien/NIMH-Akkus einsetzen und die Spannung unter 4,5 V ± 0,2 liegt, ertönt der Summer dauerhaft und die LED sollte zu blinken beginnen. Installation 1. Entfernen Sie die Batterie-Abdeckung des Senders. 2.
wendet. Gas Servo AUX 3 SPANNUNG HÖHER ALS 8.0V AN DEN EMPFÄNGER AN. DIES KÖNNTE DIE ELEKTRONIK BESCHÄDIGEN. MODSTER DASHER V2 2 1 Betriebsanleitung ACHTUNG: SCHLIESSEN SIE NIE EINE BATTERIE MIT EINER Receiver CH1 Lenkservo Verbindung v. Fernbedienung & Empfänger 1. Schalten Sie den Empfänger ein. Drücken Sie den SW-Schalter. Die LED des Empfängers sollte anfangen zu blinken. AUX 3 2 1 2. Schalten Sie den Sender ein. 3.
Betriebsanleitung MODSTER DASHER V2 Fehlerbehebung Wenn es keine Rückwärtsfunktion gibt und Sie die Mitte nicht finden können, überprüfen Sie bitte, ob sich das die Trimmung in der Mitte befindet oder nicht. Pflegehinweise 1. Verwenden Sie zum Reinigen Ihrer Geräte immer ein sauberes, trockenes Tuch oder eine Bürste mit weichen Borsten. 2. Verwenden Sie niemals chemische Reinigungsmittel, da diese die empfindliche Elektronik und den Kunststoff beschädigen können.
Betriebsanleitung MODSTER DASHER V2 Fahrbetrieb Beachten Sie die Sicherheitsanweisungen zum Fahrbetrieb in dieser Anleitung! Machen Sie sich mit dem Fahrverhalten des Modells schrittweise vertraut: • Stellen Sie sich hinter das Modell und steuern sie es zuerst von sich weg. Die Reaktion des Modells auf die Steuerung ist dann die gleiche, als wenn Sie selbst am Steuer sitzen. • Lassen Sie das Modell danach auf sich zu fahren. Die Reaktionsrichtung ist jetzt spiegelverkehrt zur Steuerrichtung.
Betriebsanleitung MODSTER DASHER V2 Anstellwinkel Die Federelemente können sowohl oben, an der Dämpferbrücke, als auch am unteren Querlenker in andere Anlenkpunkte umgesetzt werden. Auf diese Weise wird ebenfalls eine Höher-/Tieferlegung des Modells erzielt. Mit dem Umsetzen der Stoßdämpfer ändert sich aber auch der Winkel, unter dem die Kraft in den Dämpfer eingeleitet wird. Damit wird das Ansprechverhalten der Dämpfung beeinflusst.
Betriebsanleitung MODSTER DASHER V2 Einstellung des Sturzes an der Vorder- und Hinterachse Die Sturzeinstellung erfolgt über Spannschrauben (Pfeil) in den oberen Querlenkern.Drehen der Spannschraube im Uhrzeigersinn (nach vorne) verkürzt den Querlen-ker, das Rad wird oben nach innen gezogen in Richtung „negativer Sturz“.Drehen der Spannschraube gegen den Uhrzeigersinn (nach hinten) verlängert den Querlenker, das Rad wird oben nach aussen gedrückt in Richtung positiver Sturz“. 8.
MODSTER DASHER V2 Betriebsanleitung 10. Entsorgung Allgemein Entsorgen Sie das Produkt am Ende seiner Lebensdauer gemäß den geltenden gesetzlichen Vorschriften. Batterien und Akkus Sie als Endverbraucher sind gesetzlich (Batterieverordnung) zur Rückgabe aller gebrauchten Batterien und Akkus ver pflichtet; eine Entsorgung über den Hausmüll ist untersagt! Das nebenstehende Symbol weist auf das Verbot der Entsorgung über den Hausmüll hin.
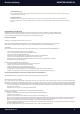
MODSTER DASHER V2 Betriebsanleitung 11. Explosionsansicht 2 226090 14 www.modster.
Betriebsanleitung MODSTER DASHER V2 226044 www.modster.
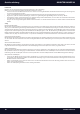
Betriebsanleitung MODSTER DASHER V2 12. Ersatzteile 16 www.modster.
Betriebsanleitung MODSTER DASHER V2 218131 LIPO AKKU 3S 11,1V 3800 MAH 35C (DEANS) www.modster.
User Manual MODSTER DASHER V2 Contents 1. Introduction S.17 2. Safety Notes S.17 3. Before Starting S.17 4. Product Information S.19 5. Contents S.19 6. Technichal Details S.19 7. How-To-Start Guide S.20 8. Maintainance S.24 9. Regularly Controls S.24 10. Disposal S.25 11. Explosion View S.26 12. Spare Parts S.28 18 www.modster.
User Manual MODSTER DASHER V2 1. Introduction Dear Customer, Thank you for chosing a product from MODSTER Racing. All models are carefully checked for completeness and function before delivery. Due to continuous development and improvement of our products, we reserve the right to make technical changes as well as changes in equipment and design without notice. Claims from minor deviations against data and illustrations of these instructions regarding the product you are presented with, can not be claimed.
User Manual • • • • • • • • • • • • MODSTER DASHER V2 Conventional alkaline batteries (1.5V) are intended for single use only and must then be properly disposed of. Dispose of empty batteries or defective batteries enivronmetally correctly at the authorized collection points. Disposal over household waste is prohibited! Batteries must not become moist or wet. Also avoid the formation of condensation water.
User Manual MODSTER DASHER V2 LiPo-Balance-Charger • After connecting the charger to a socket (230V), the LEDs light up green (charger ready for operation). • When the battery is connected to the 2S or 3S socket, the LEDs light up red, the charging process is running. • When the battery is full, when only the green LEDs light up, the battery can be disconnected. • The charger is now disconnected from the mains. • The charging current is about 1 A.
MODSTER DASHER V2 User Manual 15 14 13 7. CH3-EPA+/Please put CH4 in the middle of before you press the CH3 EPA+/-,then press EPA+/-, you can adjust the angle of ST 8. CH4-EPA+/Please put the CH4 switch on left or right, then press the EPA+/- and adjust the angle 9. Battery compartment: Houses [4] AA batteries 10. Channel 3 key. 11. Multifunction Red Indicator LED: 12.R EV: (1).
MODSTER DASHER V2 User Manual XC4R 4CH AA x4 155.10 193.70 81.30 AU X 3 2 1 Battery Installation Receiver Installation & Connection Using the AA batteries or NIMH batteries, when the voltage is lower than 4.5V ±0.2, the buzzer sounds continuously, and the LED should start flashing. Installation 1. R emove the battery cover from the transmitter. 2. I nsert four new AA batteries according to the polarity markings on the battery holder. 3. R einstall the battery cover.
MODSTER DASHER V2 User Manual Pairing The Transmitter & Receiver 1. Turn on the receiver power. Press the SW switch.The receiver’s LED should start flashing. AUX 3 2 1 2. Turn on the transmitter. 3. When the LED on the receiver becomes solid,the binding process is completed. LED AUX 3 2 1 Note: Radio systems installer in RTRs have already been bound. Only when installing a new transmitter or receiver is the above process necessary Operation A. THROTTLE TRIGGERB . STEERING WHEEL 1.
User Manual MODSTER DASHER V2 Fault Handing When there is no backward function and you can’t find the centre bit, please check, if the TRIM is on centre or not. General Care 1. Always use clean, dry cloth or soft bristle brush to clean your equipment. 2. Never use chemical cleansers, as these could damage the sensitive electronics and plastics. Start-up of the Model The model is already ready for use and can be put into operation immediately after charging the transmitter battery and the batteries.
User Manual • • • • MODSTER DASHER V2 If necessary, stop the engine with the trim on the transmitter. Press the throttle / brake lever on the remote control forward. The speed of rotation of the motor should change steadily. Now move the remote control lever backwards to check the brake and reverse speed. If the wheels rotate in the wrong direction, correct the direction of rotation with the servo reverse switch on the transmitter.
MODSTER DASHER V2 User Manual Angle of Attack The spring elements can be converted into other pivot points both at the top, at the shock absorber bridge and at the lower transverse link. In this way, the model is also raised / lowered. However, by changing the shock absorbers, the angle at which the force influences the damper also changes. This affects the response of the damping. - At a flat angle of attack, the chassis must lower more deeply before the damping is activated.
MODSTER DASHER V2 User Manual Adjustment of the camber at the front and rear axle Adjusting the camber is done by means of the tensioning screws (arrow) in the upper crossbars. Turning the tensioning screw clockwise (forwards) shortens the crossbar, the wheel is pulled upwards in the direction of „negative fall“. Turn the tensioning screw counterclockwise (after Rear) extends the crossbar, the wheel is pushed upwards outwards towards „positive fall“. CAMBER 8.
MODSTER DASHER V2 User Manual 10. Disposal Dispose of the product at the end of its service life in accordance with the applicable legal regulations. Batteries You as an end user are obliged by law (battery ordinance) to return all used batteries and accumulators; Disposal over household waste is prohibited! This symbol indicates the prohibition of disposal via household waste. Batteries are also marked with the designation for heavy metal: Cd = cadmium, Hg = mercury, Pb = lead.
MODSTER DASHER V2 User Manual 11. Explosion View 226090 30 www.modster.
User Manual MODSTER DASHER V2 226044 www.modster.
User Manual MODSTER DASHER V2 12. Spare Parts 32 www.modster.
MODSTER DASHER V2 User Manual M17 218131 LIPO AKKU 3S 11,1V 3800 MAH 35C (DEANS) www.modster.
wild.rough.