
Instructions


14 / 18
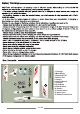
After connecting the clevises to the control horns view the vertical tail and r udder from d irectly above. The
to the right or left you can adjust the length/position of the pushrod/clevis so the surface is centered
If t he rudder is angled off to the left carefully remove the clevis from the control horn and screw it
clockwise) one half to one full turn then insert the pin back into the outermost hole in the control horn. V iew the
vertical t ail and rudder from directly above again and continue adjusting the length/position of t he pushrod/
clevis until the rudder is centered appropriately.
NOTE: You should always rotate the clevis until the pin is perpendicular with the control horn to ensure the pin
is not under any excessive load/pressure when inserted in the hole and during operation. In some cases it may
sure the pin is properly aligned then adjust the position of the trim lever slightly as needed. Also, it will likely be
still the best starting point).
Follow the same steps outlined for centering the rudder to center the elevator as well.
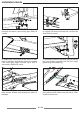
Also, we strongly recommend installing the included
clevises. Typically you can carefully s lide the keepers
over the clevises when t hey a re not connected t o the
control horn. Then, a fter connecting the clevis to t he
slide the keepers into a
position that does not a llow
of the surface.