
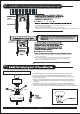
Installation Guide


5
05
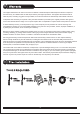
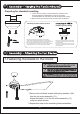
Installation of the hanging brackert(suspension part)
06
NOTE: SCREWS MUST BE TIGHTENED TILL SUNG
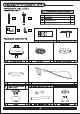
1) Use the Mounting Bracket(A) as aguide, mark the spots where the 4 Self
Tapping Screws (B) will be drilled.
2) Remove the Mounting Bracket(A), drill 4 holes for 3MM diameter,
install the mounting bracket onto wooden ceiling with 4 Self Tapping Screws (B) & Washers (C).
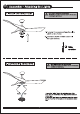
1) Use the Mounting Bracket (A) as a guide, mark the spots where the 4 Expansion
Bolts (B) will be drilled.
2) Remove the Mounting Bracket (A), drill 4 holes and insert4 Expansion Bolts(2)
into the concrete ceiling, install the mounting bracket and secure with Flat
Washers (C), Spring Washers (D) and Nuts (E).
IMPORTANT: SCREWS& NUTSMUST BE TIGHTENED TILL SUNG
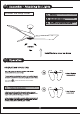
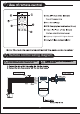
1. Thread the suspender through the suspended clock and coupling cover.
2. Then insert the tail of the suspender from the lifting head of the motor.
3. Remove the lateral pin out from the suspended head position, secure with
R type pin(Clevis pin).
4. Tighten the lifting head screws. Tighten the 2 Set Screws on the Coupling
to serve as a clamping force on the Downrod to prevent fan shaking during
operation.
5. Route the Coupling cover , Canopy Ring , Canopy and Hanger Ball through
the Downrod in turn, and then install the Lock pin through the hole on the
Downrod. Fix it by Screw, then slip down the Coupling Cover in correct position.
WOODEN CEILING
1. Installing of downrod
R type pin