
Install Instructions


INSTALLATION – VERTICAL DEFLECTOR BLADES
1-660.0 3
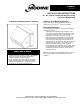
Figure 2.3 – Placing Hood on Unit
7. Grasp the hood assembly by the bottom panel or through
the opening. Lifting it slightly above the opening of the
unit, press the flanged surface of the hood against the
front panel of the unit. Using caution, slowly lower the
hood so that the lip of the top panel drops into the gap
between the hangar bracket (installed in step 2) and the
front face of the unit. The hood is now secure. Make
sure the hood is centered on the unit.
Note: Larger hoods used on the HCH 170 and 195 should be
put in place using a person on either side of the hood to
prevent undue strain.
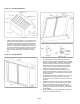
Figure 2.4 – Fastening Hood to Unit
8. Using the provided #10 x 1/2" self drilling screws, secure
the hood to the unit through the clearance holes in the
side and bottom flanges.
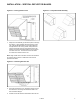
9. Position louvers as desired to direct airflow from the unit.
Figure 2.5 – Completed Hood Assembly