
Install Instructions


1-660.0
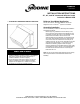
Figure 2.1 - Hood Exploded View
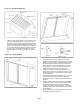
1. Install the hood hangar bracket to the top interior surface
of the unit opening (see figure 2.2), using the #10 x ½”
self drilling screws provided. Dimples located at the top
of the opening will provide locating points to secure the
bracket. Once the bracket is installed, ensure that there
is a small gap between the hangar bracket and the front
face of the unit. A screwdriver or similar tool may be
required if adjustment needs to take place to create a
gap.
Figure 2.2 – Hanger Bracket
2. Hood assembly is generally easiest if done with the
surfaces of the hood panels with flanges facing the floor.
Begin the hood assembly by positioning the hood bottom
so that the flanges are on the outside of a side panel.
Attach the bottom panel to the side panel of the hood
using the #10 x 1/2" sheet metal screws through the
provided holes. Repeat for the other side panel
3. Position the hood top so that the flanges are on the
outside of the side panels. Secure the hood to the side
panels using the #10 x 1/2" sheet metal screws through
the provided holes
4. Complete the hood frame by using the #10 x 1/2" sheet
metal screws through provided holes on the outlet
surface of the hood. Install the center louver channel if
provided.
5. Install the louvers taken from the unit (or provided with
the kit for 90° hoods). Take the louver springs used on
the unit, and place them over the tab of the louver.
Press the tab into the hood panel dimple, compressing
the spring. Slide the tab on the other end of the louver
into the dimple.
6. Provided Modine and Lodronic labels can be placed as
desired on the exterior of the hood.