
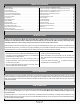
Specifications

Page 9
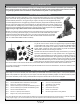
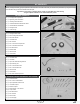
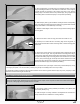
q Mix a small quantity of 5 minute epoxy and carefully glue each of the four
hinges into only the aileron for now. Make sure that each of the hinges is
centred and that the centreline of each hinge pivot point is even with the
leading edge of the aileron. Remove any excess epoxy, using a paper towel
and rubbing alcohol and allow the epoxy to set up before proceeding.
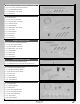
q After the epoxy sets up, push the aileron and hinges into the corresponding
four hinge slots in the trailing edge of the matching wing panel. Make sure that
the tip of the aileron is even with the tip of the wing.
q Mark the outside edges of each of the four hinges onto the trailing edge of
the wing panel.
q Remove the aileron from the wing panel and set it aside for now.
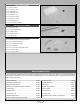
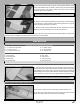
q Carefully cut a shallow bevel in the trailing edge of the wing panel, on
both the top and the bottom of each of the hinge slots, to recess the hinge pivot
points into.
q Apply a thin coat of machine oil or petroleum jelly to only the pivot point
of each of the four hinges, then hinge the aileron to the wing panel, using 5
minute epoxy. Make sure that the leading edge of the aileron is pushed rmly
up against the trailing edge of the wing panel. There should be no more than
a 1/32" (.7mm) wide hinge gap and the tip of the aileron should be even with
the tip of the wing. Remove any excess epoxy, using a paper towel and rubbing
alcohol, and allow the epoxy to set up before proceeding.
q After the epoxy sets up, pivot the aileron up and down several times to free up the hinges. If there is any excess dried epoxy on any
of the hinge pivot points, it can be removed by carefully using the tip of a modeling knife to cut or chip it away.
q Repeat the previous procedures to hinge the second aileron to the other wing panel. After the epoxy fully cures, pull gently on both
ailerons to ensure that the hinges hold securely.
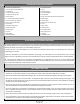
STEP 2: SEALING THE AILERON HINGE GAPS
IMPORTANT It is imperative that the aileron hinge gaps be sealed. Failure to do this can lead to control surface utter, which can
cause your aircraft to crash. Sealing the hinge gaps will also provide crisper control response and allow the aircraft to track straighter
and y truer, making ight trimming easier and more accurate.
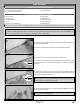
q Cut a piece of white covering material (not included) 1-1/2" (38mm) wide
and 25-5/8" (650mm) long.
q Fold the length of covering material in half lengthwise so that there is a
sharp crease down the middle of the covering material.