
Specifications

Page 8
q 5 Minute Epoxy
q Modeling Knife
q Straight Edge Ruler
q Pencil
q Machine Oil or Petroleum Jelly
q (1) Right Wing Panel with Aileron
q (1) Left Wing Panel with Aileron
q (8) Pinned Hinges
q Paper Towels
q Rubbing Alcohol
q Epoxy Mixing Sticks
q Epoxy Mixing Cups
q Heat-Sealing Iron
WING ASSEMBLY
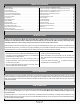
YOU'LL NEED THE FOLLOWING PARTS FROM THE KIT:
YOU'LL NEED THE FOLLOWING TOOLS AND SUPPLIES:
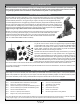
STEP 1: HINGING THE AILERONS
IMPORTANT For utter-free control surfaces and crisp control response, it is imperative that the hinges be glued in properly. This
is achieved by having a tight hinge gap [no more than 1/32" (1mm) wide] and using plenty of epoxy glue. Poor hinge installation can
lead to control surface utter which can result in a catastrophic failure of the airframe.
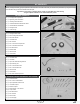
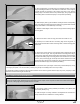
q Slide one hinge into each of the four hinge slots in the aileron, making sure
that the hinges are centred.
q Mark the outside edges of each of the four hinges onto the aileron.
q Remove each of the hinges and set them aside for now.
q Carefully cut a shallow bevel in the leading edge of the aileron, on both
the top and the bottom of each of the hinge slots, to recess the hinge pivot
points into.
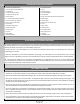
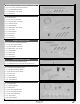
q Test-t each of the hinges into the hinge slots. The hinges should be
centred and the centreline of each of the hinge pivot points should be even
with the leading edge of the aileron.
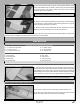
IMPORTANT The centreline of each hinge pivot point must be even with
the leading edge of the aileron so that the correct hinge gap can be achieved
when the aileron is hinged to the wing panel.
q Apply a thin coat of machine oil or petroleum jelly to only the pivot point
of each of the four hinges.
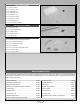
IMPORTANT The machine oil or petroleum jelly will prevent any excess
epoxy from gluing the hinges solid.
q Remove the aileron from one wing panel and set is aside for now. Discard the temporary hinges that are used for packing.