
Specifications

Page 4
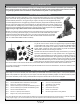
q Straight Edge Ruler
q Pencil
q Builder's Triangle
q 220 Grit Sandpaper
q Sanding Block
q Rotary Tool with Cutting Disc and Sanding Drum
q Masking Tape
q Airplane Stand
q Machine Oil or Petroleum Jelly
q T-Pins
q Paper Towels
q Rubbing Alcohol
q Epoxy Mixing Sticks
q Epoxy Mixing Cups
q Heat Gun
q Heat-Sealing Iron
q 5 Minute and 30 Minute Epoxy
q Thin and Thick Cyanoacrylate (C/A)
q C/A Debonder
q Thread Locking Compound
q Formula 560 Canopy Glue
q Silicon Sealant
q # 1 and # 2 Phillips Head Screwdrivers
q 2.5mm and 3mm Hex Wrenches
q 5.5mm and 7mm Nut Drivers
q Wire Cutters
q Adjustable Wrenches (2)
q Needle Nose Pliers
q Modeling Knife
q Scissors
q Electric Drill
q Assorted Drill Bits
TOOLS AND SUPPLIES REQUIRED
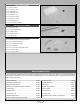
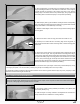
The covering material used on your aircraft is iron-on, heat-shrink covering material. It is possible with heat and humidity changes that
the covering material on your aircraft may wrinkle or sag. This trait is inherent in all types of heat-shrink material. To remove any wrinkles
that might be visible you will need to use a heat-sealing covering iron.
q Plug in and turn on your heat-sealing iron to the medium-high temperature setting. Allow your heat-sealing iron to heat up for
approximately 5~7 minutes.
q After your heat-sealing iron has reached temperature, lightly apply your heat-sealing iron to the wrinkled section of the covering
material. Move your heat-sealing iron slowly over the wrinkled section until the covering material tightens and the wrinkles disappear.
+
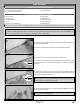
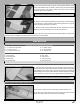
If the colour layer smears from any of the seams the temperature of your heat-sealing iron is too hot. Turn the temperature dial
down and wait about 5 minutes for your heat-sealing iron to adjust to the lower temperature. You can remove any excess colour streaks
using a paper towel soaked with a small quantity of acetone.
A NOTE ABOUT COVERING MATERIAL
l
During the covering process, sometimes colour may smear slightly from the seams. If you see any smeared colours on the covering
material, they can be quickly removed by simply wiping them off with a paper towel and a small amount of acetone.
l
Make sure to test-t the parts together before applying glue. This will ensure that the parts t properly before gluing them together.
l
When gluing anything that has a smooth surface, it's important to lightly roughen the gluing surfaces with 220 grit sandpaper. This
will allow the glue to stick better. Also, never glue directly to the covering material. Always remove the covering material from the gluing
surfaces prior to gluing the parts together.
l
When cutting away the covering material from the gluing surfaces, be careful to cut only through the covering material. Try not to cut
down into the balsa structure because that can compromise the integrity of the airframe.
l
We do not suggest storing your aircraft in an extremely hot environment (like the back of your car in direct sunlight) for any length of
time. The extreme heat could cause the covering material to wrinkle or sag and possibly damage the fragile components of the radio
control system and/or battery.
l
Epoxy can be cleaned up before it dries using rubbing alcohol, and C/A can be cleaned up before it dries using C/A Debonder.
l
The control surfaces in your kit may be held in place for packaging purposes using temporary cloth hinges. These hinges should be
discarded after you remove the control surfaces from the ying surfaces.
TIPS FROM THE PROS