
Specifications


Page 36
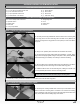
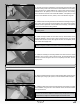
q Install one metal eyelet onto the mounting bracket that's installed on the
fuselage, using one M3 x 10mm machine screw, two M3 at washers and one
M3 lock nut.
q Feed the end of the stranded cable though the metal eyelet, then pull the
stranded cable taught and rmly crimp the metal eyelet to lock the stranded
cable into place. Cut the stranded cable off ush with the metal eyelet.
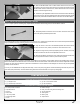
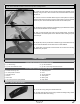
IMPORTANT When installing the metal eyelet onto the mounting bracket that's installed onto the fuselage in the procedure below,
you will need to install the machine screw from the top of the mounting bracket.
q Repeat the previous procedures to install the ying wire between the bottom
of the horizontal stabiliser and the fuselage.
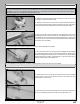
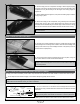
q Apply a couple of drops of thin C/A to the four metal eyelets. The C/A will
'wick' between the metal eyelets and the stranded cables, making the joints
even stronger.
q Repeat the previous procedures to install the ying wires between the top
of the horizontal stabiliser and the sides of the vertical stabiliser.
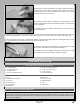
q Tighten each of the machine screws and lock nuts to secure the mounting
brackets rmly into place.
q (1) Tinted Canopy
q (2) M3 x 16mm Machine Screws
q (2) M3 Flat Washers
q (9) M2 x 10mm Flange-Head Wood Screws
FINAL ASSEMBLY
YOU'LL NEED THE FOLLOWING PARTS FROM THE KIT:
YOU'LL NEED THE FOLLOWING TOOLS AND SUPPLIES:
q Formula 560 Canopy Glue
q # 1 Phillips Head Screwdriver
q Adjustable Wrench
q Scissors
q Electric Drill
q 1/16" (1.6mm) and 5/64" (2mm) Drill Bits
q Straight Edge Ruler
q Pencil
q 220 Grit Sandpaper
q Sanding Block
q Masking Tape
q Paper Towels
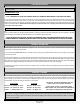
STEP 1: INSTALLING THE CANOPY
q Cut out the canopy along the moulded scribe line.
q Carefully sand the edges of the canopy smooth and straight, being careful
not to scratch the sides of the canopy.