
Specifications
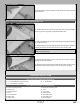

Page 20
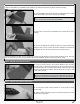
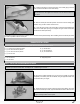
STEP 3: INSTALLING THE FUEL TANK
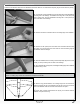
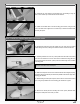
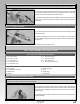
STEP 2: INSTALLING THE RUBBER STOPPER ASSEMBLY
q Secure one end of the silicone fuel tubing onto the end of the clunk.
q Slide the silicone fuel tubing, with the clunk attached, onto the end of the
aluminium fuel pick-up tube (straight tube). Adjust the length of the silicone
tubing until the end of the clunk is 4" (102mm) back from the rear of the stopper
assembly.
q Carefully bend the longer of the two aluminium tubes up at a shallow angle,
being careful not to kink the tubing as you bend it.
IMPORTANT When the stopper assembly is installed into the fuel tank,
the top of the pressure tube (the tube you just bent) should rest just below
the top of the fuel tank.
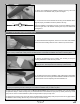
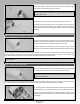
q Place the metal support ring over the neck of the fuel tank opening, then
carefully push the stopper assembly into the fuel tank and rotate it until the
aluminium pressure tube rests just below the top of the fuel tank.
q When satised with the alignment, install and tighten the M3 x 20mm
machine screw until the rubber stopper expands and seals the fuel tank opening.
q With the stopper assembly installed, double-check to make sure that the clunk can move freely inside the fuel tank. Ideally, the clunk
should be about 1/4" (6mm) in front of the back of the fuel tank. This will ensure that the clunk can't get stuck in the fuel tank during
ight. Also double-check that the end of the pressure tube rests just below the top of the fuel tank.
PRO TIP Holding the fuel tank up to a bright light will allow you to see inside to double-check the correct position of the clunk and
the pressure tube.
q Cut two pieces of silicone fuel tubing (not included) to a length of 10" (254mm)
and install them onto the aluminium tubes at the front of the fuel tank.
PRO TIP Mark the ends of the silicone tubing 'pressure' and 'pick-up' so that
you don't confuse them when it comes time to connect them to the engine
and the fuel valve later on.
q Use strips of foam rubber wedged between the fuel tank and the fuel tank
support bulkhead (or your favorite method) to hold the fuel tank rmly in place.
q Apply a layer of silicon sealant to the fuel tank opening (around the fuel
tubing) at the front of the rewall to prevent exhaust residue from getting inside
the fuselage.
q Feed the ends of the fuel tubing through the predrilled hole in the rewall and slide the fuel tank into position, making sure that the
front of the fuel tank is pushed up against the back of the rewall. Double-check that the fuel tubing is not kinked.