
Specifications
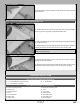

Page 19
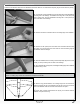
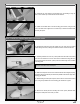
STEP 1: ASSEMBLING THE RUBBER STOPPER
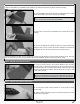
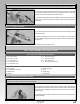
q Line up the engine mounting beams within the precut slots in the rewall
and temporarily install the four M4 x 25mm socket-cap screws, four M4 split
washers, four M4 at washers and four M4 blind nuts.
q Carefully centre the engine mounting beams over the precut slots and rmly
tighten the four socket-cap screws to draw the blind nuts into the back of
the rewall.
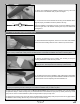
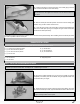
STEP 2: ALIGNING THE ENGINE
q Loosen the four socket-cap screws and lock nuts so that the engine can be
slid back and forth.
q Measure the distance from the front of the fuselage to the back of the
spinner backplate. Adjust the depth of the engine so that the measurement is
9" (229mm).
q When satised with the alignment, rmly tighten the four socket-cap screws and lock nuts.
q (1) 500cc Fuel Tank
q (3) Aluminium Tubes
q (1) Rubber Stopper
q (1) Metal Plate - Small
q (1) Metal Plate - Large
q (1) Fuel Pick-up (Clunk)
q (1) Silicone Fuel Tubing
q (1) Metal Support Ring
q (1) M3 x 20mm Machine Screw
FUEL TANK ASSEMBLY AND INSTALLATION
YOU'LL NEED THE FOLLOWING PARTS FROM THE KIT:
YOU'LL NEED THE FOLLOWING TOOLS AND SUPPLIES:
q Silicon Sealant
q # 2 Phillips Head Screwdriver
q Modeling Knife
q Scissors
q Straight Edge Ruler
q Pencil
q Masking Tape
q Airplane Stand
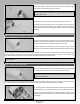
IMPORTANT Discard the shortest aluminium tube. It will not be used for our style of fuel tank setup which uses a fuel valve. Only
a fuel pick-up line and a mufer pressure line are required.
q Push the two aluminium tubes through the rubber stopper, then slide the
large diameter metal plate over the tubes at the front of the rubber stopper
and slide the small diameter metal plate over the tubes at the rear of the
rubber stopper.
q Adjust the tubes so that they both are 3/8" (10mm) out from the front of the
stopper assembly.
IMPORTANT The precut mounting slots in the rewall are elongated to allow you to mount engines of varying width. To ensure that
the engine lines up with the centre of the cowl, it's important that the engine mounts be centred within the precut mounting slots.