
Specifications


Page 16
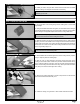
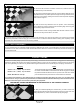
q Disconnect the clevis from one elevon control horn, so that the elevon can
be deected fully in both directions.
q Remove the protective backing from the covering material. With the elevon
fully deected in the 'UP' position, place the length of covering material over the
hinge line (on the bottom), making sure that the crease is pushed completely
down into the hinge line.
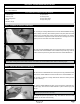
q Pivot the elevon up and down several times to check for free movement, then reconnect the clevis to the control horn and repeat
the previous procedures to seal the hinge gap on the second elevon. The elevons should be able to smoothly pivot completely up and
completely down without interference from the covering material.
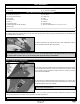
q With the elevon fully deected in the 'UP' position, use a heat-sealing
iron to adhere the covering material to both the trailing edge of the wing and
to the leading edge bevel of the elevon.
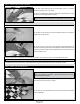
q Either trim the excess covering material ush with both surfaces or iron it
down onto the wing and the elevon, as shown.
+
Only the bottom of the hinge gap needs to be sealed. It is not necessary to seal both the bottom and the top.
It is very important that you understand throttle management. Basically, this means no full throttle dives. Full throttle dives should be
avoided so as not to cause control surface utter and/or airframe failure. When the nose of the aircraft drops, decrease the throttle, just
as in full-scale aircraft.
STEP 2: THROTTLE MANAGEMENT
Ailerons: 3/8" (10mm) Up and Down
Elevator: 3/8" (10mm) Up and Down
Test Flying
We recommend initially setting up the aircraft using the Test Flying control throws. These control throws are suggested for initial test ying
because they will allow the aircraft to y smoother and make it easier to control. You can increase the control throws to suit your ying
style, but only AFTER you've become very familiar with the ight characteristics of the aircraft using the Test Flying control throws.
CONTROL THROWS
q After you're nished adjusting the control throws, you need to cut two 1/4"
(6mm) lengths of silicone fuel tubing and slide one piece over each clevis. The
tubing will prevent any chance of the clevises opening during ight.
The aircraft requires approximately 1mm of Reex (both control surfaces up)
for neutral. To set the Reex, centre both elevons with the wing tips, then adjust
the pushrods so that both elevons are 1mm up from centre. This is the neutral
point and should be the point where the control throws are measured.