
Specifications


Page 15
C/G AND BALANCING
IMPORTANT It is critical that your aircraft be balanced correctly. Incorrectly balancing your aircraft can cause your aircraft to lose
control and crash!
+
Once you have own and become familiar with the ight characteristics of the aircraft, the C/G can be moved fore or aft to change
the ight performance. Moving the C/G back will cause the aircraft to be more responsive and aerobatic, but less stable. Moving the C/G
forward will cause the aircraft to be more stable, but less responsive. See warning above.
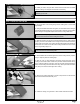
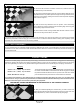
q Apply two short pieces of masking tape onto the TOP of the aircraft,
sides of the of the radio compartment.
q Turn the aircraft over (upside down) and place your ngers on the masking tape, then carefully lift the aircraft. If the nose of the
aircraft falls, the aircraft is nose heavy. To correct this, move the ight battery back far enough to bring the aircraft into balance. If the
tail of the aircraft falls, the aircraft is tail heavy. To correct this, move the ight battery and/or receiver and ESC forward far enough to
bring the aircraft into balance.
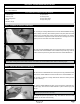
IMPORTANT When balanced correctly, the aircraft should sit level or slightly nose down when you lift it up with your ngers at
the C/G location.
l
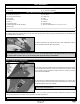
MEASURED AT THE SIDES OF THE RADIO COMPARTMENT.
This is the recommended C/G location for test-ying. After you
become familiar with the ying characteristics of the aircraft, you can move
the C/G forward or backward to suit your ying style. We suggest moving the
q Straight Edge Ruler
q Masking Tape
YOU'LL NEED THE FOLLOWING TOOLS AND SUPPLIES:
AIRCRAFT SETUP INFORMATION
Before adjusting the control throws and ying your new aircraft, there are some points about the aircraft's setup that you should be aware
of. We strongly suggest following these suggestions to get the most enjoyment out of your aircraft.
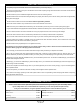
Because of the high speed that the aircraft ies at, we suggest that the elevon hinge gaps be sealed. Failure to do this can lead to control
surface utter, which can cause your aircraft to crash. Sealing the hinge gaps will also provide crisper control response and allow the
aircraft to track straighter and y truer, making trimming much easier.
The hinge gaps can be sealed using heat-shrink covering material or clear vinyl tape. To seal the hinge gaps using heat-shrink covering
material, follow these procedures:
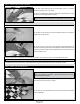
STEP 1: SEALING THE HINGE GAPS
q Cut a piece of covering material 3/8" (10mm) wide and 8" (203mm) long.
q Fold the length of covering material in half lengthwise so that there is a
sharp crease down the middle of the covering material.
4-1/4" (108mm)