
Instruction manual


Before starting model construction, examine the kit and study the
plans carefully. Familiarizing yourself with the kit will serve two
purposes. First, it will let you determine that all parts have been
supplied as listed. And second, you’ll be surprised at just how
quickly handling the parts allows you to better understand the kit
requirements. Try to visualize how every part will look on the
completed model. Also, determine ahead of time what must be
done first. The instructions will help you in this regard, but a thor
-
ough knowledge of the plans at the outset is essential.
It is suggested that all small fittings and hardware be sorted into
labeled boxes or compartments to avoid loss during the building
process.
1. The Plans
Six Plan Sheets are provided:
1. Plank-On-Bulkhead Hull Patterns - Sheet 1 of 6
2. Plank-On-Bulkhead Hull Construction - Sheet 2 of 6
3. Hull Plan and Profiles - Sheet 3 of 6
4. Hull and Spar Details - Sheet 4 of 6
5. Rigging and Sails - Sheet 5 of 6
6. Rigging Sections and Details - Sheet 6 of 6
In addition, a set of sketches appears throughout the instruction
manual to further illustrate the various stages of construction.
The
Pride of Baltimore II kit is manufactured to a scale of 3/16” = 1’ 0”.
Each plan sheet is drawn to the exact scale that the model is to be
built, except where some details have been enlarged for clarity.
Most often, a clarifying detail is twice as large as the model scale;
3/8” = 1’ 0”. Most dimensions can be lifted directly off the plans by
using a set of draftsman dividers or by using a “tick” strip, which
is simply a piece of paper used to “pick up” the dimensions (a roll
of calculator tape works very well). Lay your paper strip over the
plan and mark the lengths of items carefully with a sharp pencil.
Then use the strip to transfer the marks to the wood or item to be
made to scale. When ticking the larger scale details, just cut the
measurement in half.
It is handy to have a triangular architect’s scale. Measuring and
cutting parts using the 3/16” scale gives you a better feel for real
ship sizes. You would need this scale for building a model with full
ship sizes shown on the plans. However, the
Pride of Baltimore II
plans have already been converted and show only actual model
sizes. Actual sizes were converted to the nearest 1/64”, or 1” full
scale. Consequently, you will be working in increments of 1/64”.
For example, if the actual size was 2-1/2” (or 5/128” model scale)
it has been rounded up to 3/64”; close enough at this scale and it
better fits the standard basswood sizes.
2. Making Allowances Along the W
ay
Try to be exact when following the plans, but use common sense
along the way. You may need to make adjustments or allow for
small differences in how your model is shaping up; perhaps your
mast has too much rake (the angle at which it sits). When lines go
to belaying points they should not drape over parts or conflict with
other lines. If necessary, move a belaying point or a fairlead. In
other words, put yourself on the ship and use your judgement.
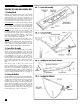
3. Understanding Hull Lines
Beginners may not be familiar with hull lines. Buttock lines are ver-
tical longitudinal planes cut through the hull. Waterlines are hori-
zontal planes, and sections are transverse vertical planes. All of
these lines define the hull shape and are used by the draftsman to
fair the hull form (create regular even curves).
A complete set of hull lines is not shown on the plans because they
are not needed for this particular model. With the plank-on-bulk-
head construction, the laser-cut bulkheads and center keel define
the hull form. These are based on the
Pride of Baltimore II designer
hull lines to the outside of the planking, but are made smaller to
allow for the thickness created by adding the planks. The Hull
Planking Layout on Sheet 2 shows all the bulkhead lines together
which are similar to a lines drawing body plan that shows the sec-
tions. Consult these lines when it is necessary to determine the
hull form slopes. This will be necessary when installing the bul-
warks since the bulwark stanchions are built separately from the
lower bulkheads.
4. Using Basswood Lumber
Standard cut basswood is available in sheets and strips. Normal-
ly, thicknesses are available in 1/32”, 1/16”, 3/32”, 1/8”, 5/32”,
3/16”, 1/4”, and 1/2”. Widths of strips are available in the same
increments. Sheets may be 1”, 2”, 3”, or 4”. A thickness of 3/64” is
a manufactured thickness, but not found in many catalogs. It is
being supplied in this kit because it is needed for full-size ship
thicknesses of 3”, as is the case for the main rail.
Note
: Your kit will contain either U. S. grown basswood or Euro-
pean limewood. Lime is similar to and just as good a model wood
as our well-known basswood. In fact, it has superior steam bend
-
ing qualities to basswood. Both woods are a similar species from
trees called lime and linden. Limewood is often called basswood
in Europe.
For the model scale 3/16” = 1’ 0”, 1/64” is equal to 1” full ship
size. 1/32” is equal to 2”, and so on. Generally, the available sizes
of basswood fit the full ship size quite well and the strips or sheets
can be used directly. Occasionally, you will find a size where the
strip must be thinner than the basswood size supplied. In order to
use a correct thickness, you will need to sand down a certain
thickness of basswood. This is easily done with a sanding block
before making a part.
If you are fortunate enough to own a powered sanding thickness
planer for models, all the better. These can be purchased com-
mercially. You can also make your own, using a drum sander in a
drill press. Clamp a block alongside the sander so the wood can
be inserted between the block and sander. It’s a makeshift deal,
but it works quite well.
A thickness of 1/64” is required for many parts in this kit. Birch
aircraft three-ply plywood could be used for this thickness. How-
ever, since it is birch, not basswood, it will not stain exactly the
same as basswood. There is a lot of staining to be done, so it is
preferable to stick with basswood so that the color will be uni-
form. Just bite the bullet and sand a 1/32” piece down to 1/64”.
It is a good idea to sort the wood contained in the kit by thickness.
When building a certain part, select a suitable size from the prop
-
er thickness pile. After cutting what you need, return the remain-
ing piece to that thickness pile. This saves a lot of time looking for
a given thickness. Don’t worry about using a piece for one item
that was intended for another. It will all come out in the wash.
There is enough extra wood in the kit so you should not run out
before you complete the model.
5. Cast-Metal Fittings
The kit is supplied with Britannia metal castings. The Britannia
metal is a great improvement over the white metal that was used
in some older kits. Unlike white metal and pewter, Britannia does
not contain lead, so there are no possible corrosion problems.
Many of these fittings, however, will require final finishing before
they are suitable for installing on the model.
8
HOW TO WORK WITH THE PLANS & PARTS