
Instruction manual


RUNNING RIGGING
It is now decision time. Will you rig with sails, or rig
without? The following paragraphs discuss both
choices and how to go about rigging them. Each par-
ticular sail, along with its spars, is presented sepa-
rately so you can finish one sail grouping entirely
before moving to the next. The sequence is not that
critical, but it is recommended that you start at the
bow. Do all the fore and aft sails first, then add the
square sails.
The Jig Is Up
! Most old-time rigs have a running end
and a standing end. The standing end goes to an eye-
bolt or other fixed point. The other end is the running,
or hauling end. The
Pride of Baltimore II topsail yard
halliard rig is a good example of this rig: the standing
end goes to an eyebolt on the starboard rail, and the
running end on the port side has a purchase that
belays to the pin rail. In contrast, most of the other rigs
on the ship, such as head sail halliards, main and fore
peak halliards and throat halliards have a tackle on
the standing end, yet all the hauling is done on the
other, or running end. On the
Pride of Baltimore II, this
tackle on the standing end is described as a
jig; i.e., a
halliard jig, throat jig, etc. Captain Glover explained
that this tackle is for “tuning up” the rig. During nor-
mal operations at sea, the tackle is not touched––all
the hauling is done from the running end, which in
most cases, does not have a tackle at all. This type of
rig is unique to
Pride of Baltimore II and not generally
found in old rigging texts.
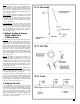
1. Jib Topsail, Jib & Fore Staysail
For simplicity, this group of sails can also be called
head sails. So, if you’ve decided to install sails on the
model, add the halliard blocks with rigging line,
downhauls, and sheets to the sails before installing
them. Allow extra length for each line, so that when
you finish reeving them through the various blocks,
you will have enough left for belaying. Secure all the
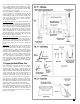
head sails to the stays using metal hanks. On the
model, you can use a simple brass ring (see figure
78). The downhaul fairlead also requires a hank
which should be lashed to the sail about midway up
the sail.
Plan sheet 5 shows the rigging for the head sails and
the block locations. The sheet for the jib topsail that
leads to the mooring chock and cavel belay point
should be run outside of the fore shrouds, so it will
be clear for “running”. The other sheet not in use
should simply drape loosely over the sail to the other
side. You can rig the fore and aft sails on either tack
you desire. Just remember that one sheet should be
taught, and the other slack. Generally, you should
keep them consistent throughout the ship. Plan sheet
5 shows them on the port side.
If you’ve decided not to use sails in your rigging
plan, attach the halliard block to the downhaul and
take the downhaul to the end of the jibboom as
shown (see figure 79). The halliard runs are identical
to a rig with sails, except for the location of the head
block. The sheets can be omitted. The fore staysail
sheets, however, require a belaying pin on the pin rail
especially for storing the sheet, so you could install
these sheets and attach them to the designated pins:
adds a little more detail for interest.
The upper block for the jib and staysail halliard jig
can remain in the same location with or without sails.
Since the hauling is done on the other end, the jig
blocks will not move when sails are raised or low-
ered. This would not be true if the tackle was on the
hauling end. The topsail yard halliard shown on plan
sheet 6 is an example.
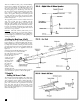
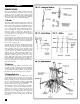
2. Foresail
Bend the foresail to the gaff with lacing as shown (see
figure 80). Add the peak and throat halliard blocks
and brail blocks, and make up the two halliard jigs to
go on the main rail. Add the foresail sheets to the sail.
Next, install the gaff and seize the sail to the mast
hoops with thread.
Reeve the peak and throat hal-
liards and add the gaff jaw parral. Seize the brail
blocks to the masthoops (if you installed the brail
blocks back when we talked about the masts, you are
ahead of the game). Add the brail lines. Don’t pull up
the brails so tight that it causes you to pull in the sail.
Add the sheets, and the fore tack at the mast, and
finally, the port and starboard gaff vangs. Lay the
other loose sheet on the deck and shackle it to the
deck eyebolt, then belay it.
If you don’t rig a foresail, install all the brail blocks,
but omit the brail lines. The gaff can remain aloft in
the same position with a foresail. The sheets can be
detached from the sail and hooked to the pin rails for
stowage, or omitted. If you want to use a furled fore-
sail, see the sketch on plan sheet 6. This is the proper
look. The sail should be furled on both the gaff and
the mast.
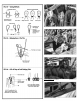
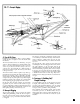
3. Mainsail
The main sail should be bent to both the boom and
gaff, with all blocks and lines attached prior to instal-
lation (see figure 81). Do as much in-hand work as
possible. After installing the boom and gaff, seize the
sail to the mast hoops with thread. The halliards are
the same as on the foresail, and should be reeved first
to hold the rig up.
The boom guys shown on plan sheet 5 are used only
when the ship is in port or at anchor. They are used
to steady the boom. If you rig the model with no sails,
or furled sails, the guys should be installed.
The main boom sheets look a little odd with a single
and double block up at the boom rather than a triple
block. Captain Glover explains that it is because of
weight, and because the lines lead better through the
two blocks. Well, what do you know!
With no mainsail, you can bring the gaff down or
leave it up. This ship does have a single gaff vang
both port and starboard, so with the gaff up, you can
use the vangs to steady it. Belay the vangs anywhere
along the rail (normally, they are belayed to the
boom).
4. Ringtail
If you install the ringtail, it should be made up along
with the mainsail. The entire mainsail and ringtail
should be installed together. Again, do as much in-
hand work as possible. Without sails, leave the ring-
tail boom in place, or omit it. Omit the ringtail yard.
40
STAGE I