
Instruction manual

STANDING RIGGING
Keep your standing lines handy, sorted by sizes, and
have them all nicely beeswaxed before you start. For
seizings, you can use cotton, silk, or nylon sewing
thread. These also should be beeswaxed beforehand.
Keep your white and super glues handy for dabbing
to seizings, if necessary, to hold them in place.
1. Shrouds
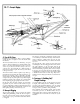
Begin the standing rigging with the lower shrouds.
The lower deadeyes have steel chain plates. These are
made of brass strip provided in the kit. Plan sheet 6
shows the proper sequence for installing the shrouds.
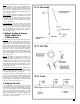
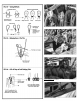
To set up the shrouds, make a temporary jig of brass
wire to establish the spacing of the deadeyes for
doing the seizing (see figure 73). This figure also
shows the sequence for reeving the lanyards. Keep an
eye on the masts as you rig shrouds, so you will not
pull them out of line.
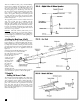
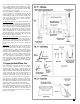
The fore topmast also will have shrouds, but not the
main topmast. Instead of chain plates, however, there
will be futtock shrouds. These can be made from
brass rod and are connected to the mast band below
the crosstrees (see figure 74).
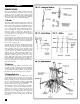
After the shrouds are in place, add the ratlines. Three
optional methods are shown (see figure75). In addi-
tion to the sheer pole just above the deadeyes, the
Pride of Baltimore II also has some wood battens about
every fifth ratline position instead of ratlines. Make
sure you beeswax the ratlines well before they are
installed. The wax will help hold the ratlines into a
slight downward curve. If the ratlines tend to bow
upward, tug them gently into position. You may
need to add a little super glue to “freeze” them. Rat-
lines are difficult to do if you tie the clove hitches. Try
to hold a group of shrouds between your fingers, so
that as you tie the knots, you will not alter the spac-
ing between shrouds.
2. Backstays
The backstays will be similar to the shrouds, except
no ratlines will be connected. The forward backstay
should go from the topmast directly to the deadeyes
along the hull. The main backstays should first lead
through holes in the end of the crosstree spreader.
3. Running Backstays
The running backstays can be added next or you
could wait until the fore and aft stays are in place.
Notice that the fall line for the port main running
backstay should go through a snatch block on deck on
its way to the bulwark cleat for belaying. Apparently,
this was done to avoid the stowed topgallant yard
and the sail located across the top of the cleat.
The running backstays will need baggy wrinkles
along the line to “prevent sail chafing.” There also
should be one on the forward stay. On the real
ship, these are fuzzy rope strands platted up. For
the model, you can make them from wood, paint
them, and if desired, sprinkle some wood dust, or
other similar substance, in the paint to make them
look fuzzy.
38
STAGE H