
Instruction manual

37
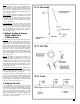
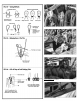
piece of scrap cloth and set the tension so the thread
does not make puckers in the stitch line. No actual
reinforcement patches need be used. Instead, simply
sew two stitch lines to represent reinforcements, such
as the reef bands (see figure 70).
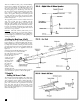
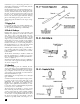
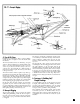
After the stitching is completed, you may iron the
sails. Be careful not to burn them. Next, cut the sail
shape using line “A” as shown in the sketch. Then
roll the hem according to the sketch, iron it flat, and
then sew (as close to line “B” as possible). Tuck the
ends and hand sew the corners as shown. The sail is
now ready for stretching.
Stretching the Sails
: This step will assure that the sail
shape is correct, since it may have been altered dur-
ing sewing. Using the original pattern, draw the out-
line of the sail’s shape on a piece of paper. Place the
piece of paper down on a solid ,but penetrable back-
ing, such as a wooden board or cork. Now wash the
entire sail again and lay it over the outline you’ve just
drawn. Stretching the wet sail to the outline’s shape,
stick pins through its outer edges and into the back-
ing to hold it in place. When the sail is dry, it will
have the proper shape. Iron it flat.
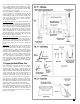
Edge Boltropes & Reef Points
: Sewing edge boltropes
onto the sail can be omitted since they appear so
small in 3/16” scale. However, if you wish to include
them you may follow the tedious method shown (see
figure 71). The sketch also shows how to install reef
points.
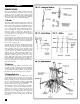
Furled Sails
: It is impossible to furl a sail made from
the same material and of the same size used for the
fully set sail. The cloth is usually too heavy, causing
the sail to become too bulky looking. There are two
solutions to this problem. First, you may use a lighter
material such as Silkspan, which is a model airplane
covering tissue; or second, you may elect to use the
same cloth, but cut it to a proportion one-third the
size of the original to reduce bulk (see figure 72).
Make a test first to see how much material is required
for a nice tight furl. Even if you furl the sails, you
must still add some seams and hems, since the detail-
ing will show.
10. Rigging the Model Without Sails
Even though you may have chosen not to include
sails, you ought to include most all of the lines
attached to the sails, such as topsail clew lines and
sheets, buntlines and leechlines, and fore and aft sail
halliards and downhauls. On the real ship these lines
are not removed when sails are removed, but are
simply shackled together, tied off to jackstays, or
secured to some other stowage point. Plan sheet 6
shows the various riggings in the stowed positions.
The mast hoops should be in place on the masts.
Include all the belaying pins even though there may
be no lines belayed to them. Even if you show just the
spares, they will look better than the bare holes.
When rigging a model without sails, most modelers
do not install bunt and leech lines, or reef tackle and
their blocks, and they omit most all of the sheets for
fore and aft sails. The choice is yours. But, the more
lines you install, the more fun it will be––and in the
end, the more realistic.