
Instruction manual


tackle before it goes to the belaying pin. In this case a
detail will be referenced to show the tackle, then the
belay number is referenced.
On this particular ship, conventional belaying pins as
we know them are used at the side pin rails at the
shrouds, and in the main rail aft. All the pins in the
fife rails, at the head, and in the main boom and
boom rest are actually fixed 1/2-inch diameter
bronze rods, instead of regular removable belaying
pins. For the model, glue in a piece of brass wire.
All belaying points should have a coil of rope (see fig
-
ure 66).
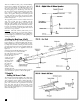
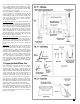
7. Rigging Tools
It is possible to make some useful homemade tools
essential for the rigging process (see figure 67). You
can also purchase similar shapes commercially.
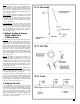
8. Blocks & Deadeyes
Rigging plans sheet 5 and 6 show all blocks and
deadeye sizes required for a model with or without
sails. Sheet 6 shows some block details. The sizes
shown on the plans are actual model sizes. You will
see a number of 1/16” blocks on the plans ( 4” full
ship size ), but you will not find this size included in
the kit. Only 3/32” and 1/8” blocks are provided. It
seems that the 1/16” wood block is no longer manu-
factured. You must use a 3/32” block provided, or
file that block down to 1/16”. The 3/32” block should
be sufficient. It will not look out of scale at all.
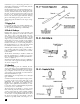
When the plans indicate a bullseye, you will need to
use a deadeye and ream out the center to make a
bullseye. Commercial wooden bullseyes are current-
ly unavailable.
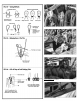
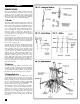
The kit blocks and deadeyes should be sanded and
the holes reamed larger, so it will be easy to reeve
lines. An indispensable jig for holding small blocks is
shown (see figure 68).
Stropping the blocks like the real ones is difficult at
3/16” scale. Some suggested modeling alternatives
are shown (see figure 69).
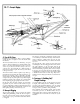
9. Sailmaking
In order to keep the plans less cluttered, the sails
shown on the plans are not completely drawn. How-
ever, there is sufficient information given for detail-
ing a complete sail. Shown are the overall shape,
seam spacing, and some details of corner reinforce
-
ments and attachments to spars.
When making sails, it is important to choose the right
type of material.
Sail cloth for models must be light in weight, yet fair
-
ly opaque. A fine weave cotton cloth such as the
unbleached 100% cotton muslin available from
Model Expo is acceptable. An excellent choice is
Egyptian cotton spinnaker cloth referred to as “bal
-
looner cloth”. Linen is an ideal material, but probably
too heavy for 3/16” scale models.
The cloth must be pre-shrunk, so wash it several
times. When dry, iron the cloth, but be careful not to
scorch it. Next, draw the seams and hem (tabling)
lines and other reinforcements in light pencil, then
sew the seams. A sewing machine makes fast work of
the project. Use light tan cotton thread so that the
seams show up nicely. Make some trial passes on a
36