
Instruction manual


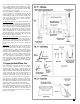


34
not as top heavy as the one in item A, but still has
some of the drawbacks of cutting out the detail. Actu-
ally, a topsail schooner is a better candidate for sails
than a square rigger. Fore and aft sails look nice on a
model. With fewer square sails, the overall effect is
less heavy.
Model with Furled Sails
Furl all the fore and aft sails and the topsail. Stow the
furled topgallant sail on the port bulwark aft of the
shrouds (it does not get furled in place). The topsail
yard should be lowered on its lifts. All studding sails
and ring tail sails and yards would be removed and
stowed below on the real ship. The studding sail and
ring tail boom would be put in their stowed position.
This rigging option is a nice compromise. You will
get the feel of having sails, yet because they’ve been
furled they will let you see all the other detailing.
Model with Mixed Furled & Hoisted Sails
For this option, use a mix of furled sails and full open
sails, or sails with yards partially down. The topsail
could be partially pulled up by buntlines and clew
lines. This look would give the ship an appearance
somewhat like it might be while in port; some sails
furled, and some still partially up as if drying out
after a day’s run. There are a lot of possibilities here,
so look for a pleasing effect. Take a look at artists’
paintings to get some ideas. Marine artist John Sto-
bart’s work is an ideal reference.
Model Without Sails
A.
Without sails, the model should have the fore top-
sail yard lowered on its lifts. Omit the topgallant
yard. The fore gaff should be in the up position, the
main gaff in the down position on top of the main
boom. This is a proper look, as if the ship is in port,
and the sails have been removed for repairs. The only
drawback is the main gaff. When down, which is
where it should be for this rigging option, the space
aft of the main mast looks awfully empty.
B. This option is the same as A, except that you should
put the main gaff in the up position. In this position
you could fly the American flag on the flag halliards
from the gaff. This is the approach selected by most
modelers and typically what you see in museums.
With the gaff hoisted, that empty space disappears
and the overall model looks balanced. Beginners
should definitely select this option.
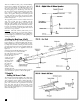
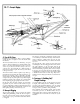
2. Using the Rigging Plans
The details of all the masts and spars are shown on
plan sheet 4. The actual rigging is shown on plan
sheets 5 and 6. Sheet 5 shows a profile of the ship, the
standing rigging, and the running rigging for fore
and aft sails. It also shows the braces for the square
sails. Plan sheet 6 has a section at the main mast and
two at the fore mast, one with sails and one without.
This sheet shows most of the rigging for the square
sails. Sheet 6 also includes the important belaying
arrangement, some block details, and some furled
sail details.
Rigging plans are often confusing because of the
numerous lines involved, and the fact that overlap-
ping and concealing of some of the detail occurs.
Every effort has been made to make the
Pride of Balti
-
more II
rigging procedure as clear as possible on the
plans. Where a line goes behind something, a detail is
referenced to show the entire rig. Also, the instruc-
tion manual shows more sketches to help you under-
stand the entire rig.
3. Rigging Line Sizes & Colors
The rigging lines provided in the kit do not cover all
the sizes shown on the plans. There are only certain
sizes available and the kit contains only a .009” and
.017” diameter line. It is suggested you use the larger
line for all lines on the plans that are .012” or greater.
You may want to search out different line sizes to get
closer to the plan sizes, but you will not see any major
improvement at this scale. If you do want more vari-
ances in size, look for linen or a good grade of cotton
thread.
The color of the lines is shown on the plans. All lines
should be tan or weathered grey, except where noted
to be black. In general, most of the standing rigging
will be black.
4. Wire vs. Rope Rigging Line
The real Pride of Baltimore II is a replica of a 19th cen-
tury schooner, but because it was built in the 20th
century, most of the standing rigging is wire instead
of good old rope. For the model, cotton or nylon
cordage is provided instead of wire, but the diameter
is that of wire. You may observe that sometimes a
lanyard between deadeyes is as large or larger than
the standing line it serves. This is because the wire is
much stronger than the hemp lanyard. On a ship
with hemp shrouds or stays, the lanyard would be
much smaller than the line it serves.
5. Treating the Lines
Worming, Parcelling & Serving: Lines on ships were
wormed, parcelled and served (a method of protect-
ing parts of a rope) where they are likely to be chafed,
such as the shrouds. For models, worming (“laying
thin pieces of line (the worms) between the strands”),
and parcelling (“winding strips of canvas saturated
with tar over the part wormed”) is unnecessary. Only
serving (“tightly binding the wormed and parcelled
area in the other direction with spun yarn”) should be
considered. Serving the lines should be done with fine
silk or linen thread. Avoid fuzzy cotton, if possible.
Since the real
Pride of Baltimore II has wire rigging,
worming and parcelling was not done. The wire is
served with a small line, or just coated, or both. For
this model, because of the small sizes, serving is not
recommended. Just use the line as-is and coat it heav-
ily with beeswax.
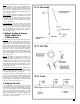
Seizings
: Use sewing thread or silk to seize the lines.
After securing each line, touch the seizing with thin
super glue or diluted white glue (see figure 64 for
some seizing methods).
Beeswax
: Beeswax protects the lines against moisture
and helps to eliminate fuzz. Hold the beeswax up to
a light bulb if it is hard. Run the line across the
beeswax block. Then run it through your fingers to
soften it and smooth it out. Do this several times so
you get a good coat of wax on the line.
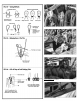
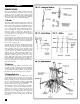
6. Belaying Pins & Their Lines
You’ll find a belaying pin arrangement on Sheet 6.
See figure 65 which illustrates how to belay a line to
a pin. While not all pins are used if you omit sails, the
pins can, and should be, installed on the model.
Each pin location on the plan is numbered and is ref-
erenced on the particular line that gets belayed there
or elsewhere on the plan. Sometimes a line goes to a