
Instruction manual

31
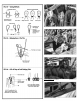
Cleats: Finally, add the cleats around the fore mast as
shown on the plans. The cleats are supplied as Bri-
tannia fittings but you can make them from wood if
desired. In any case, drill a hole through the cleat and
insert a pin for securing the cleat to the mast. Glue
alone will not do the trick; the cleat will probably fall
off as you belay a line.
Mast Assembly
: With all parts made and pre-fitted,
and the mast hoops in place, assemble tops, caps, and
the topmast on the lower mast. Before you glue
everything in place, check to make sure the topmast
is in line with the lower mast. Adjust the holes if nec
-
essary (see figure 58).
Mast Installation
: Paint and stain the masts before
you install them. Insert the masts in the deck holes
and add some slivers of wood, as necessary, to secure
the mast in the hole. Check the alignment forward,
aft and athwartship so the angles are in accordance
with the plans. Finally, make the mast wedges as
shown (see figure 59).
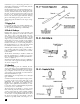
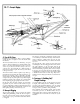
4. Building & Installing the Bowsprit,
Jibboom, Dolphin Striker
& Jibboom Spreaders
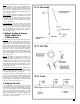
Bowsprit: The bowsprit should be made from square
stock, not a dowel. The bowsprit goes from square, to
octagonal, then to a round shape. The bowsprit cap is
supplied laser-cut, but like the mast caps, you will
need to angle the holes. The cap should have an iron
band around it. This can be made from brass or omit-
ted. First, cut the bowsprit to the right length and
make sure you have a perfectly square stick. Next,
cut the bottom angled section inboard off the square.
The octagonal shape comes next, then cut the round
shape forward. Finally, cut the tenon at the forward
end (see figure 60).
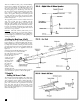
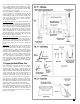
Jibboom
: The jibboom is straight forward. It does not
require any fittings. But, three holes need to be
drilled at the end for the head stays to pass through.
Assemble the cap and jibboom on the bowsprit. Be
careful to align it correctly before you glue. The aft
end of the jibboom fits into a shaped block as shown
on the plans. Just ahead of the block, the jibboom is
lashed to the bowsprit.
Dolphin Striker & Jibboom Spreaders: Make the dol-
phin striker and jibboom spreaders and attach them
to the bowsprit cap fitting. They should be secured
by a pin through eyebolts (see figure 61).
Insert the bowsprit assembly through the bow into
the samson posts. Again, check the alignment. Make
sure you have all the fittings, eyebolts, and holes fin
-
ished. When you start to rig, you will want them to
be ready. There is a small angle iron at the heel which
bolts the bowsprit to the samson posts.
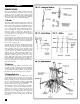
5. Building the Fore Yards
You will build the fore lower yard (also called the
course yard), topsail, and topgallant yards now, but
the installation will be done later during the rigging
stage. Some of the rigging, however, is included with
the yard construction because it’s easier to do with
yards in hand. Footropes and lashings for the stud
-
ding sail and ringtail booms are best added at this
stage. They are shown along with the spar details on
plan sheet 4 (see also figure 62).