
Instruction manual


gon is equal to the diameter of the round part of the
mast above. This means that the distance across the
corners of the octagon is larger than the diameter of
the round part of the mast. The dowel provided in the
kit is 5/16” diameter, which is the diameter of the
round part. If you cut the octagon into the dowel, the
distance across the flats will be too small. On the other
hand, since you will have a mass of cleats and belayed
rigging lines in this area, you may not notice the dif-
ference.
If you want to do it correctly, you must first build up
the heel by adding some wood to increase the diam-
eter. Afterward, you may cut the octagonal shape
which will flow smoothly into the basic diameter (see
figure 53).
The fore and main topmast are similar except for the
length, and they must be tapered. The heel of the top-
mast dowels must also be modified to incorporate the
increased width of the square section. In the heel, drill
a hole and square it up with a file. The hole will hold
a fid which prevents the topmast from falling through
the top (see figure 54).
After the basic masts are completed, drill any holes
required to represent sheaves in the masts. You do
not need to install actual sheaves. They would be
covered by the line anyway. The topmasts also
require a cheek block on the side of the mast at top.
Mast Hoops
: Important! The kit contains laser-cut
plywood mast hoops. Even though you may not rig
the model with sails, the hoops should be put in place
on the masts. Placement must be done BEFORE the
masts are assembled. So, before you add the boom
rest on the mainmast, and before you add deck
wedges on either mast, slide the hoops onto the
masts. This also would be a good time to seize the
brail blocks to the mast hoops, before putting the
hoops on the masts.
Put thirteen 7/16” O.D. (outside diameter) hoops on
the foremast, sixteen 7/16” O.D. hoops on the main-
mast, and eight 5/16” O.D. hoops on the main top-
mast for the gaff topsail.
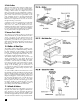
Mast caps
: Both mast caps are supplied laser-cut.
However, since the caps will need to fit the mast at an
angle, you will have to shape the holes in the caps to
fit the square masthead tenon and the topmast diam-
eter (see figure 55). The cap should also have an iron
band around it. It can be made from brass strip or
omitted. Add all the eyebolts though.
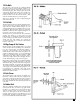
Trestle Trees & Crosstrees
: Next, make the trestle
trees and crosstrees according to the plans (see figure
56). The primary difference between the fore and
main crosstrees is in the length. Two of the crosstrees
at the foremast require a hole for the futtock shrouds.
The mainmast crosstree needs only one hole for a
backstay. The crosstrees act like spreaders. There are
no shrouds for the main topmast.
Shades of the 20th century!––on the main mast trestle
trees, you will find an enclosed radar dome with
horns below the dome. Add the radar for a true
Pride
of Baltimore II
replica, but if you wish to model an
authentic old-time Baltimore clipper, please do not
include this radar.
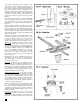
Boom Rest
: The main boom rest is also provided
laser-cut. File the hole so it will fit on the mast. Glue
it, then add the support brackets. Notice that the side
brackets have a hole for a belaying rod (see figure 57).
30