
Instruction manual


30. Ship’s Name
The PRIDE OF BALTIMORE II name should be let-
tered on the stern and bow as shown on the plans.
Also, the name
CHASSEUR must be applied to the
stern of the ship’s boat. The best way to add these
details is to use dry transfer letters. These can be pur
-
chased at a number of art and office supply stores.
After applying the lettering, paint over the letters
with a coat of flat varnish. You can also find decal let-
tering from model railroad stores.
With the dry transfer letters, you may not be able to
find the right colors. The stern has gold and red. If
you can’t find these colors, use white or black letter-
ing, then paint over the letters. This is tedious, but the
letters provide the guide, so painting the colors by
hand usually looks good.
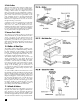
31. Ship’s Boat & Cradles
Cut the ship’s boat cradles from basswood. The seat
is rubber on the real ship. For the model, just paint
the top black. On the real ship, the cradles are remov-
able. For the model, glue them in place.
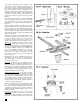
The ship’s boat is unique. Instead of the usual Britan-
nia casting or solid block boat found in most kits, this
kit has laser-cut lifts for “bread & butter” construc-
tion (see figure 49). As shown, there are end tabs on
each lift to assist with the alignment. The wide tab is
the stern and the narrow tab is the bow. Each lift from
tab end to tab end is the same length. As you glue
upward on the lifts, keep the tabs in line. Use only a
thin coat of glue. If you get too much glue on each lift,
the accumulated thicknesses of the glued lifts will
create an overall height that is too great.
Next, you will be doing some carving, and will be
faced with a challenge: how thin can you carve the
hull without breaking it? Begin with the inside of the
boat first, using chisels and sandpaper. Carve or sand
the corners of the lifts down to the intersection of two
lifts. When all is smooth, the shape should be reason-
ably correct. Next, cut off the tabs and carve the hull
to the correct profile. Then, carve or sand the outside
form. Be careful; the hull will be getting thin by now.
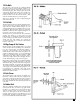
Carving a small boat hull is difficult. Make some tem-
plates from the body lines shown on the plans to get
the shape correct. Use a homemade double-ended
caliper as a way to check the thickness of the hull (see
figure 50). Add the keel and rudder and you will be
done with the basic hull.
Option
: The boat may be easier to carve if you tem-
porarily leave the two solid bottom lifts off initially.
Carve the inside close to the finished shape, then add
the bottom lifts and complete the inside carving.
How far you want to go with detailing is up to you.
You can add bottom boards, frames, thwart knees,
and gunwale molding. All these details add to the
model, but will be a little difficult. If you do it, always
keep the scale in mind. This is a delicate boat. Make
the thwarts 1/64” thick (sand down a 1/32” piece).
This particular boat on the real ship is lap strake
planked. You can carve or file the laps in the outer
hull of the model if you desire. Again, this is critical
carving. Beginners may want to pass this up for now.
If you are not up to a full open boat, you can do the
outside and cover the top. Lash the boat down to the
deck eyebolts as shown on the plans.
28