
Instruction manual


17. Steps
The small steps port and starboard shown on the
plans are used for stepping up to the gangway when
in port. Make these using 1/32” basswood sanded to
1/64”.
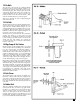
18. Lifelines
The kit provides brass wire for making the lifeline
stanchions for inserting in the main rail (see figure
44). At the bow and stern, insert an eyebolt in the rail
for securing the ends. The line should run through
the eyes in the stanchions. Notice on the outboard
profile of the plans, that the line is tied to the shrouds
rather than having a stanchion at that location. On
the model, droop the line slightly between stan-
chions. It should not be too taught.
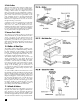
19. Life Rings
There are three life rings and they are provided as
Britannia metal fittings in the kit. One should be
installed on top of the access hatch forward, held by
wooden chocks. Two aft life rings should be hung on
a cleat inside the bulwarks both port and starboard.
These are colorful orange rings with white cord. If
your kit casting does not contain the cord, glue on a
thread to simulate the cord. On each ring of the real
ship, black lettering spells out
Pride of Baltimore II. At
our model scale, forget it, unless you are one of those
people who can write the Gettysburg Address on the
head of a pin.
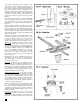
20. Cavels & Mooring Chocks
Make these from wood and install as shown (see
figure 45).
21. Channels
The channels can be made from wood strips and
installed now, or wait until you make the chain plates.
Consult Stage H for chain plates and channels.
22. Eyebolts & Cleats
The kit has a sufficient number of metal cleats and
eyebolts. You could make your own cleats out of
wood, but at this scale they are rather small to create
from scratch. Since there will be some strain on these
items from rigging, they must be secured firmly. Drill
a small hole through the cleats and insert a brass wire
or pin. Drill a hole in the deck or wherever required
and insert the eyebolt and cleat pin. Use some super
glue on a toothpick and touch the glue around the
eyebolt and cleat to secure it. Careful...not too much
glue! Tug on it to be sure that it will not come out.
The eyebolts are simply a wire bent into a loop. If you
want to close the loop, touch the opened parts with a
little solder.
The locations for all of the rigging eyebolts are shown
on the deck plan and bulwarks. Between this plan
and the rigging plan, you should have no trouble
finding the exact locations.
26