
Instruction manual


The top 3/64” plank should continue across the gun
-
ports. Apply a 1/32”-square vertical strip of wood on
each side of the gunport, simply to cover the end
grain of the bulwark plank (you could omit this on
the model).
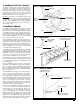
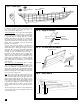
Next, fit a fashion piece on each side of the transom
as shown (see figure 26).
9. Planking the Deck
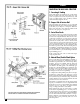
Hatch & Trunk Coamings: Before planking the deck,
you must decide how you want to treat the hatch and
trunk coamings. A recommended approach for doing
it the way it was done on the real ship, is to install all
coamings first. You can then plank around the coam-
ings. This saves some planking work and material.
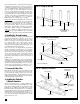
On the underside of the coamings, insert some scrap
wood so the deck planks have support for gluing (see
figure 27).
If you elect not to install the coamings now, they
must be included in the construction of the hatches
and trunks and glued down on top of the deck.
Deck Planks
: The deck planks should be 1/16” thick
x 3/32” wide except for a 1/16” x 3/16” plank port
and starboard at the centerline. On the real ship, the
two center wide planks are just slightly thicker than
the other planks. It is not necessary to indicate this
variation in size at this 3/16” model scale.
Prepare the strips by painting one edge black or dark
brown. When the planks are glued together, this will
simulate caulking in the seams. You can also use a
brown colored carpenter’s wood glue on the edges of
the planks. When dry, this glue is dark enough to
simulate the caulking.
Thick Pads
: There are some thick pads that must be
put on the deck around the windlass (used on the
real ship to take abrasion from the anchor chain). The
pads are shown on the plans. Add these doublers on
top of the deck planks.
Deck Inserts
: As shown on the plans, there is an
insert located under each of the fife rails. These
inserts should be flush with the deck planking. You
can add them as you plank the deck, or just omit
them. The inserts are stained the same color as the
fiferail so you could just stain the area rather than
actually adding the insert.
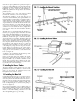
Deck Planking Procedure
: The deck planks should be
laid parallel to the centerline. Start at the centerline
and work outboard. The nibbing plank is a narrow
plank running parallel with the planksheer. Cut the
nibs into the edge of the planksheer as you go (see
figure 28).
Scrape off any glue squeeze-out before going to the
next plank. Planking butts can be used, like the outer
hull, or they can be omitted. On the real ship, they do
not show up as readily as the seams. You can also
scribe butts after the planks are laid. Since there is no
cutting or curves involved like there was with the
hull planking, using long deck strips is no problem.
Use brads or treenails if you like. See Hull Plank dis-
cussion.
19