
Instruction manual
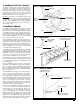
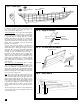


4. Spiling
Edge-bending planks on a real ship is done, but it is
limited. The wood is very stiff, so many planks must
be cut to shape. Spiling is the term used for laying out
the cuts (see figure 16). It’s simply a matter of trans
-
ferring curves to a straight plank, then sawing the
plank to shape. For the
Pride of Baltimore II model, the
wide planks landing at the sternpost should be the
only strakes you need to spile. For narrow planks, the
basswood strips are flexible enough so they can be
edge-bent in place.
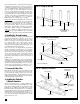
5. Fastening the Planks
There are some fancy plank clamps on the market,
but they are more trouble than they are worth. They
must be screwed into the edge of the bulkheads, leav
-
ing big holes to contend with when doing subsequent
planks. With short pieces, you can hold or pin the
planks in place. Be careful not to split the plank with
the pins. If necessary, drill a small pilot hole first.
Glue each plank to the bulkheads, and edge-glue
them together. For the edges, use white or carpenter’s
wood glue so that setting will not occur too fast. At
the bulkheads, it is good to use thin super glue to
quickly secure the plank in place. Be careful not to
glue your fingers.
While glue alone will hold the planks, you may wish
to use small brass brads or wooden treenails for addi-
tional holding power, or just for looks. Using fine
brass brads, cut off and discard the heads, then ham-
mer them into place. If treenails are desired, you can
buy them commercially. Better yet, get some long
bamboo skewer sticks, strip off small pieces, then pull
them through a draw plate until you have very small
dowels. Drill holes for the treenails, add a touch of
glue, and drive them into place. Treenails are good if
you want to add them for each frame. While there are
no frames, only bulkheads, use the bulwark stan-
chions for locating where a frame would be.
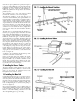
6. Planking the Outer Hull
Belt Layout: Now the fun begins! The hull is divided
as follows: a single strake below the planksheer, a
wale below that strake, then four belts A through D.
The wale is a thick band of planking which cannot be
varied from the real ship. The lower planking, on the
other hand, could be slightly different and would not
be noticed. The wale will be painted a light color.
From the Hull Planking Layout drawing, use a tick
strip along each bulkhead location and mark the wale
location and the belt seams below. Using a tick strip,
transfer the location of the seams on each bulkhead
and mark them with a pencil. Now, using 1/16” x
3/32” temporary basswood battens, lay the battens
along the marks and temporarily tack them in place.
The purpose of the battens is to assure an accurate
flow of the planking belts. Although the Hull Plank-
ing Layout was developed to provide an accurate
flow of belts, errors in drafting and tick strip marking
and transferring may occur. With the battens actual-
ly in place, these errors can be corrected.
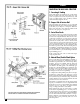
With all the battens in place, visually check their
flow. Look at the model from the side and from the
bow and stern. Do the battens have nice smooth
curves? Adjust the battens if necessary (see figure
17). The plans show what they should look like from
the side and ends. When everything seems okay,
remark the belt seam lines on the bulkheads, making
sure they are clearly indicated. You do not want to
15