
Instruction manual
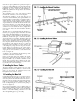


in smooth curves. Each belt is designed so the planks
lay against the hull without having to excessively
edge bend them. They sweep up at the ends like the
deck sheer. Within each belt, the planks are usually
spaced evenly, tapered, and fitted as required. The
belts help accomplish the planking job without accu-
mulating errors as you work.
When selecting a belt width and the number of
planks within each belt, you need to consider how
the planks will lay against the frames and how they
will taper. If the planks are too wide, they will not lay
flat on the bulkheads. Also, you don’t want them to
taper so much that there is no width left for fasteners.
This would require substituting a larger plank for
two to increase width. Also, in some areas, the planks
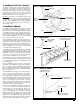
may get wider rather than taper. If they get too wide,
a stealer plank must be cut into the plank. While
these alterations are acceptable and are used on
many ships, it is best to design the run of planking to
limit the number of such inserts (see figure 14 which
illustrates some of these inserts).
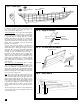
For the
Pride of Baltimore II model, a planking layout
has already been developed for you. The layout is
taken from the actual ship and is shown on the P-O-B
plans. The belts are not necessarily related to how the
real ship was planked, but were selected for the con-
venience of the model maker. The real ship planking
has been followed as closely as possible and was
based on photographs and several key measure-
ments of planking widths. Stealers have been placed
where they were found on the real ship.
3. Planking Butts
Before you start, consider the planking butts. Since
the lengths of wood cut from trees are generally
shorter than the overall lengths of real ships, ship-
builders generally have to work with planks only 20
or 30 feet long. Some modelers think it is easier to use
a plank length the full length of the model. Fake butts
can be scribed in later or omitted. Granted, this can
be done. It’s really up to the modeler. By using short-
er pieces, however, there are some advantages. Since
all planks taper to some degree, using the shorter
piece will let you mark the taper quick, and the plank
will be easier to fasten in place. And with a short
piece, only one hand is necessary to hold it down.
Also, if you make a mistake, you only have a small
piece to do over. So, the following is based on the use
of the shorter lengths.
Planking butts will not be exactly like the real ship.
Because the model is designed to be built on the bulk-
head system, no attempt was made to identify all the
butts,so a deviation from the real ship planking butts
was necessary.
A plank length approximately 6 inches will cover
four bulkhead spaces. This is a comfortable length to
handle for this model. To scale, it is a plank 32 feet
long. However, to avoid having very short pieces at
the bow and stern, you may need to use a longer
plank to complete the run.
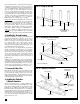
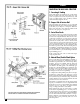
To follow real ship rules, you should stagger the butts
on the model (see figure 15 for a sequence that is sim-
ilar to that of a real ship). The stagger also applies to
the deck planking. The 6-inch long plank works well
with the rules. With this length you can meet the rule
for three full plank-widths between butts on a single
frame. If you use a plank length to cover only three
bulkhead spacings, this would not be possible. Since
the butts occur on bulkheads, you would wind up
with only two full planks between the butts.
PLANKING THE PLANK-ON-BULKHEAD HULL
Before getting started, it is a good idea to know some
of the more common shipbuilding terms that apply
to the planking process. Consider the following few
key words as you work:
1. A
plank is a single length of wood used for plank-
ing a hull or deck. A planking
strake is a continuous
line of planks, butted end to end from bow to stern,
or wherever the strake begins and ends.
2. A
garboard strake is that strake of planking adjacent
to the keel.
3. The
sheer strake is the uppermost main hull strake.
4. The
wale is a heavy layer of strakes below the sheer
strake along the length of the hull’s side.
5. When discussing planking
belts, we are talking
about a group of planks along the hull. Belts are laid
out using
battens, which are temporary strips of flex-
ible wood used to locate the belt. A
ribband is also a
batten, used on boats and ships to hold the frames in
place while the planking is being added. Ribbands
are removed as the planking is completed.
6. Spiling is a term used to describe a process for
marking and cutting a plank to a given shape.
7.
Edge-bending, also called springing, is when you
bend a plank edgewise.
8. When planking, the use of the word
fair refers to
smooth, gradual curves.
9.
Nib or nibbing is where one plank runs into anoth-
er at a sharp angle. In order to eliminate the feathered
edge, the plank is cut off on the end and it is fitted
into a similar cut in the other plank. Nibbing is gen-
erally applied to decks, but hull planks are also
nibbed.
10. A
stealer is a plank inserted into another plank, or
notched in between two adjacent planks when the
spacing between the planks gets too wide. Or, when
two planks are tapering toward a narrow end, it may
be necessary to cut off both planks, then substitute a
wider plank to continue so there will be enough
wood left for fastening the end of the plank. I’m at a
loss for the proper term for this. One model publica
-
tion calls it a
joggle plank, but I’m not sure about that.
Stealer is a common term , but joggle plank is not.
11. The
counter is the underside of the overhanging
portion of a ship’s stern.
1. Getting Started
The planking process is tedious and you should plan
on spending some time doing the job. Work on each
plank as a project unto itself. Rushing will only result
in frustration and a poor result.
Since both sides of the hull will be identical, you can
cut two planks the same shape at once. Fit the plank
on one side, then the other. Before starting, place the
hull upside down and secure it in a vise or cradle.
Something portable would be ideal so you can rotate
the hull easily.
2. Planking Battens & Belts
It is easier to plank a hull by first dividing the hull
into a series of “belts”. The belts flow along the hull
14
STAGE B