
Instruction manual

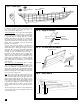


Glue the two-piece planksheer together, then glue it
to the top of the bulkheads, port and starboard. The
planksheer should extend beyond the edge of the
bulkheads by 3/32”. After the hull planking is
added, the planksheer will protrude out from the
planks by 1/32”.
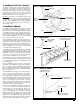
The planksheer across the stern must be fitted
between the stern knees as shown on the plans.
The bulwark stanchions on the real ship are not
extensions of the hull frames, but separate timbers set
between frames. For the model, you will proceed in a
similar manner except that the stanchions will go
only to the bottom of the planksheer. The stanchions
are provided laser-cut in the kit. Notice that the stan-
chion at the cathead is 1/8” wide while all others are
3/32”. If for some unknown reason this particular
stanchion was laser-cut like the others, simply add a
piece of 1/32” sheet to the side to make the stanchion
1/8” wide.
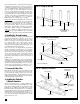
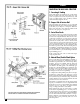
The trick now is to install the bulwark stanchions so
that they are properly angled and follow the hull
form. Using the Hull Planking Layout drawing as a
guide, and also paying attention to the shape of the
bulkheads, install and glue a bulwark stanchion
about every three or four inches. Check the angle and
make sure it is exact. Next, insert the remaining stan-
chions in the planksheer holes, but before gluing
these in place, add the inboard stringer at the top of
the stanchions. This stringer will act as a guide for
fairing the other stanchions. You may need to put
some temporary strips between the port and star-
board stringer to hold them to the correct shape.
When satisfied with the alignment, add a touch of
super glue at each stanchion to secure them in the
holes (see figure 11).
A stringer is also required at the inboard top of the
stern knees. Glue this on at this time.
Notice on the plans that each stanchion has cham-
fered edges on the inboard side. At 3/16” scale, it
may be overkill to try to add these chamfers on the
model. They would be more effective if the stan-
chions were made from a harder wood, such as cher-
ry, and the scale were a little larger.
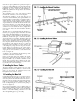
9. Installing the Hawse Timbers
The hawse timbers will be glued to the top of the
planksheer. Fit the hawse timbers as shown on the
plans (see also figure 12). Drill the hawse holes
through the lower section as shown.
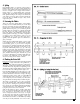
10. Installing the Main Rail
Cut the main rail from 3/64” x 1/2”-wide stock pro-
vided in the kit and according to the plans. Use sev-
eral scarf joints in the main rail. Cut each section so
the grain of the wood follows the rail. Fit the rail care
-
fully on top of the bulwark stanchions. Drill some
holes for alignment pins or dowels before gluing as
shown (see figure 13).
Most of the basic framing is now complete and you
will begin the planking next. First, take a moment to
look over what you have done so far. Re-check the
fairness of the hull. Making corrections now will
allow the planking process go smoothly.
13