user’s manual 1
Wireless router Contents User’s manual guide 4 Chapter 1 Introduction 4 Features 4 1.2 Operation Environment 5 1.3 System Requirements 6 Chapter 2 Hardware Installation 6 2.2 Back Panel Features 6 2.3 Typical install Chapter 3 Quick Install Guide 3.1 TCP/IP Settings 3.2 Getting Started 3.3 Setup Wizard 2 6 2.1 Led indicators www.modecom.
Wireless router Chapter 4 Advanced Setup 18 4.1 Wireless Advanced setup 18 4.2 Service Setup 21 4.3 Security Setup 24 4.4 QoS Setup 29 4.5 Router Setup 29 4.
Wireless router User’s manual guide Latest versions of manuals, quick start guides, drivers and software are available on www.modecom.eu website. IMPORTANT NOTE: Provided technical specifications are subject to change without prior notice. All brand and product names mentioned in this manual are trademarks and/or registered trademarks of their respective holders. © 2010 MODECOM S.A. All rights reserved. Duplication and copying requires approval from copyright holder.
Wireless router Quality of Service (QoS) - WMM, WMM-PS Auto wireless transmission channel select for optimal performance Wireless access control (MAC address filter) Advanced Wireless control: Fragment Threshold / RTS Threshold / Beacon Interval Preamble Type: Long / Short IAPP - Roaming (802.11f) Protection / Aggregation / Short GI / WLAN Partition RF Output Power control Multiple BSSID Dynamic DNS: DynDNS.org / TZO / 3322.
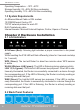
Wireless router Operating Temperature : -10ºC ~50ºC Storage Humidity: 5% ~95% RH Non-condensing Operating Humidity: 10% ~90% RH Non-condensing 1.3 System Requirements An Ethernet-Based Cable or DSL modem 10/100M Ethernet Card on PC TCP/IP network protocol for each PC RJ45 Twisted-pair cable Internet browser: Microsoft Internet Explorer, Firefox, Opera or Chrome Chapter 2 Hardware Installation 2.1 Led indicators SYS/Power (Red): Flickering light indicates a proper connection to the power supply.
Wireless router LAN(1,2,3,4): 10/100Mbps RJ45 Auto-sensing. These four LAN ports are where you will connect other network devices, such as PCs/Laptops, print servers, remote hard drives, and anything else you want to put on your network. If you connect this product with the Network adapter, Hub (or Switch) correctly, the Router’s corresponding LED and the Adapter’s, Hub’s (or the Switch) will illuminate. WAN: 10/100Mbps RJ45 port. The WAN port is where you will connect Cable/DSL Modem or other LAN.
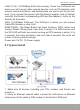
Wireless router Chapter 3 Quick Install Guide 3.1 TCP/IP Settings Before you can access and configure router, you have to setup your network adapter IP address. According to the following steps to obtain IP address automatically from router DHCP Server, The following instruction set up the computer running windows operation system. Note: The router default IP address is 192.168.1.1 1. Click Start button and choose Settings, then click Control Panel. 2.
Wireless router 3.2 Getting Started To access configuration panel open your web browser (MS Internet Explorer, Firefox, Opera or Chrome) and type the router’s IP address: 192.168.1.1 Default User / Password: admin If successful, you can see the status page.
Wireless router 3.3 Setup Wizard Click on “Wizard”, it will guide you to setup your router in six simple steps. Please follow the steps and complete the router configuration. Step 1 - Setup Operation Mode The router supports three operation modes, Gateway, Bridge and Wireless ISP. And each mode is suitable for different use, please choose correct mode. 10 www.modecom.
Wireless router Step 2 - Time Zone Settings The Time Configuration option allows you to configure, update, and maintain the correct time on the internal system clock. Time Zone Select: Select the Time Zone from the drop-down menu. NTP Server: Select the NTP Server from the drop-down menu. Step 3 - LAN Settings Setup the IP address and Subnet mask for the LAN interface. Step 4 - WAN Settings The Router support five access modes in the WAN side, please choose correct mode according to your ISP Service.
Wireless router Mode 1: DHCP Client Select DHCP Client to obtain IP Address information automatically from your ISP. This mode is commonly used for Cable modem services. Mode 2: Static IP Select Static IP Address if all IP information is provided to you by your ISP. You will need to enter in the IP address, subnet mask, gateway address, and DNS address(es) provided to you by your ISP.
Wireless router IP Address: Enter the IP address assigned by your ISP Subnet Mask: Enter the Subnet Mask assigned by your ISP. Default Gateway: Enter the Gateway assigned by your ISP. DNS: Enter the DNS server assigned by your ISP. Mode 3: PPPoE Choose PPPoE (Point to Point Protocol over Ethernet) if your ISP uses a PPPoE connection. Your ISP will provide you with a username and password.
Wireless router User Name: Enter your PPPoE user name. Password: Enter your PPPoE password. Mode 4: PPTP Choose PPTP (Point-to-Point-Tunneling Protocol ) if your ISP uses a PPTP connection. Your ISP will provide you with IP information and PPTP Server IP Address, of course it also includes a username and password. IP Address: Enter the IP address. Subnet Mask: Enter the subnet Mask. Server IP Address: Enter the PPTP Server IP address provided by your ISP. User Name: Enter your PPTP username.
Wireless router Mode 5: L2TP Choose L2TP (Layer 2 Tunneling Protocol) if your ISP uses a L2TP connection. Your ISP should provide you with a username, password and all necessary data. IP Address: Enter the IP address. Subnet Mask: Enter the subnet Mask. Server IP Address: Enter the PPTP Server IP address provided by your ISP. User Name: Enter your PPTP username. Password: Enter your PPTP password.
Wireless router Band: Supported standards: 802.11B, 802.11G, 802.11N and mixed. Please choose its band according to standards used by devices which will be connected to router. Mode: Support AP, Client, WDS and AP+WDS mode. Network TYPE: This type is only valid in client mode. SSID: Service Set Identifier, it identifies your wireless network. Channel width: Select 40MHz if you use 802.11n or 802.11n mixed mode, otherwise 20MHz, it is default value.
Wireless router The following picture shows how to set the WEP security. Key length: WEP supports 64-bit or 128-bit security key. Key Format: User can enter key in ASCII or Hex format. Key Setting: Enter the key, accordingly to chosen format. The keys are used to encryption data transmitted in the wireless network. Fill in the text box by following rules below: • 64-bit: Input any 5 ASCII characters or 10 digit Hex values (in the “A-F”, “a-f”, and “0-9” range) as the encryption keys.
Wireless router Pre-Shared Key Format: Specify the format of the key, passphrase or hex. Pre-Shared Key: Enter the key, accordingly to chosen format. The keys are used to encryption data transmitted in the wireless network. Fill in the text box by following rules below: • 64-bit: Input any 5 ASCII characters or 10 digit Hex values (in the “A-F”, “a-f”, and “0-9” range) as the encryption keys.
Wireless router WPS: Checking this box and clicking “OK” will disable WPS function. WPS is turned on by default. WPS Status: When Router’s settings are factory default, it is set to open security and un-configured state, some registers such as Vista WCN can configure AP. Otherwise If it already shows “Configured”, it means that the router has setup its security. Self-PIN Number: Its is AP’s PIN. Start PBC: Clicking this button will invoke the Push Button Configuration of WPS.
Wireless router Mode: If you choose ‘Allow Listed’, only those clients whose wireless MAC addresses are in the access control list will be able to connect to your Access Point. When ‘Deny Listed’ is selected, these wireless clients on the list will not be able to connect the Access Point. The MAC Address format is 001122334455. 4.1.3 Wireless Distribution System (WDS) WDS uses wireless media to communicate with other APs, like the Ethernet does.
Wireless router WDS: Check this box to enable WDS function. MAC Address: Enter the remote AP MAC address. Security: Set WDS security. Encryption: You may select WEP 64bits, WEP 128bits, WPA (TKIP), WPA (AES). WEP Key Format: You may select to select ASCII Characters or Hexadecimal Digits (in the “A-F”, “a-f” and “0-9” range) to be the WEP Key. WEP Key: Set key to encrypt your data Pre-Shared Key Format: You can select PASSPHRASE or HEX(64 CHARACTERS).
Wireless router Protocol & Port Range: The packet with this protocol and port will be redirected to their local IP. Comment: You can add some comment for this item. Current Filter Table: The table shows all you have configured. You can delete one or all. 4.2.2 Trigger Port Some applications require multiple connections, like Internet games, video conferencing and so on. These applications cannot work with a pure NAT router.
Wireless router Incoming Protocol: The Protocol used for Incoming Ports Ranges, either TCP or UDP, or both. Comment: You can add some comment for this item. 4.2.3 Demilitarized Zone (DMZ) If you have a client PC that cannot run Internet application properly from behind the NAT firewall or after configuring the Port Forwarding, then you can open the client up to unrestricted two-way Internet access. Status: Clicking this box will enable DMZ function.
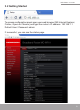
Wireless router 4.3 Security Setup The router provides extensive firewall protection by restricting connection parameters to limit the risk of intrusion and defending against a wide array of common hacker attacks. 4.3.1 Security The firewall will allow or block some services according to the following settings. Ping Access on WAN: Whether allow or block to Ping WAN interface. IGMP Proxy: Simple, dynamic Multicast Routing Daemon using only IGMP signaling.
Wireless router 1. IP Filter Allow or block the computers according to its IP address. 2. MAC filter Allow or block the computers according to its MAC address.
Wireless router 3. URL filter You can block some URL according to URL Key words. If Source IP or MAC is blank, it means all computers can not access this URL, otherwise the rule will be only valid to one computer with this IP or MAC address. Example 1: Block “testurl.com” at all computers. Example 2: Block all URL with “testkeword” at one computer with IP address 192.168.1.105. 26 www.modecom.
Wireless router Example 3: Block all URL at all computers from 09:00 to 18:00 on working days. 4. Port filter You can limit some or all computers to access some destination IP and port. Example 1, block all computer to access port 21. Example 2, block one computer with IP address 192.168.1.101 to access port 21.
Wireless router 4.3.3 Denial of Service (DoS) This page used to Block DoS attack. 28 www.modecom.
Wireless router 4.4 QoS Setup The QoS helps improve your network gaming performance by prioritizing applications. By default the bandwidth control is disabled and application priority is not classified automatically. In order to complete this settings, Please follow the steps below. Enable this function. Enter the total speed or choose automatic mode. Enter the IP address user want to control.
Wireless router Static Route: Click this box to enable static route. IP Address: The network or host IP address desired to access. Subnet Mask: The subnet mask of destination IP. Default Gateway: The gateway is the router or host’s IP address to which packet was sent. It must be the same network segment with the WAN or LAN port. Routing Table: Clicking this button will show you all the routing table of the system. Static Routing table: It only shows the static routing table and you can delete one or all.
Wireless router 4.6.2 Save/Load Config You can backup or restore the system configuration in this page. Save to File: Save the router’s settings and store it in your local computer. Load from File: Restore the settings from saved file. Resotore to factory: Restore the system settings to factory default. 4.6.3 Reboot You can reboot device via clicking the Reboot button. 4.6.
Wireless router Spis treści Instrukcja instalacji 34 Rozdział 1 - Wprowadzenie 34 1.1 Specyfikacja 34 1.2 Środowisko pracy 35 1.3 Wymagania systemowe Rozdział 2 - Instalacja 36 36 2.1 Diody LED 36 2.2 Panel tylny urządzenia 36 2.3 Typowa instalacja 37 Rozdział 3 - Skrócona instrukcja instalacji 38 32 3.1 Ustawienia TCP / IP 38 3.2 Wprowadzenie 39 3.3 Kreator konfiguracji (Setup Wizard) 40 www.modecom.
Wireless router Rozdział 4 - Advanced Setup 48 4.1 Ustawienia zaawansowane sieci bezprzewodowej (WLAN) 48 4.2 Ustawienia usług 50 4.3 Ustawienia zabezpieczeń 53 4.4 Konfiguracja QoS 59 4.5 Router Setup 60 4.
Wireless router Instrukcja instalacji Najnowsze wersje instrukcji, sterowników i oprogramowania dostępne są na stronie www.modecom.pl WAŻNA INFORMACJA: Podane dane techniczne mogą ulec zmianie bez wcześniejszego powiadomienia. Wszystkie znaki towarowe umieszczone w instrukcji należą do ich właścicieli. © 2010 MODECOM S.A. Wszelkie prawa zastrzeżone. Kopiowanie lub powielanie wymaga zgody właściciela. Rozdział 1 - Wprowadzenie Gratulujemy zakupu tego wspaniałego routera.
Wireless router Szyfrowanie 64/128-bit WEP Obsługa Quality of Service (QoS) - WMM, WMM-PS Automatyczny wybór optymalnego kanału transmisji bezprzewodowej Kontrola dostępu do sieci bezprzewodowej (filtr adresów MAC) Zaawansowane ustawienia sieci bezprzewodowych: Próg fragmentacji / Próg mechanizmu RTS / Częstotliwość wysyłania Beacon Długość Preambuły (długa / krótka) Roaming - IAPP (802.11f) Regulacja mocy nadajnika Multiple BSSID Dynamic DNS: DynDNS.org / TZO / 3322.
Wireless router Wilgotność otoczenia podczas przechowywania urządzenia: 10% ~ 90% RH (bez kondensacji) 1.3 Wymagania systemowe Połączenie Ethernet lub modem DSL Karta Ethernet na PC 10/100M Obsługa protokołu TCP / IP dla każdego komputera Kabel Ethernet RJ45 Przeglądarka internetowa Microsoft Internet Explorer, Firefox, Opera lub Chrome Rozdział 2 - Instalacja 2.1 Diody LED SYS / Power (czerwona): Dioda miga, gdy urządzenie jest podłączone do zasilania.
Wireless router LAN (1,2,3,4): RJ45 10/100Mbps. Do tych czterech portów LAN, można podłączyć urządzenia sieciowe, takie jak komputery PC/Laptopy, serwery wydruku, zewnętrzne dyski twarde i wszystko, co chcesz podłączyć do sieci. Jeśli router jest poprawnie połączony z kartą sieciową, Hubem (lub przełącznikiem), diody na routerze i Hubie (lub przełączniku) będą świecić. WAN: 10/100 Mbps port RJ45. Port WAN do którego należy podłączyć model kablowy DSL lub inne urządzenie sieci LAN.
Wireless router Rozdział 3 - Skrócona instrukcja instalacji 3.1 Ustawienia TCP / IP Aby uzyskać dostęp do panelu konfiguracyjnego routera, należy skonfigurować kartę sieciową. Postępuj zgodnie z instrukcją w celu uzyskania adresu IP automatycznie z serwera DHCP routera, Poniższa instrukcja opisuje konfigurowanie komputera z systemem operacyjnym Windows. Uwaga: domyślny adres IP routera to 192.168.1.1. 1.
Wireless router 3.2 Wprowadzenie Aby uzyskać dostęp do panelu konfiguracyjnego, należy otworzyć przeglądarkę internetową, taką jak Internet Explorer / Firefox / Opera / Chrome i wpisać adres IP routera: 192.168.1.
Wireless router 3.3 Kreator konfiguracji (Setup Wizard) Aby uruchomić kreator, który przeprowadzi cię krok po kroku przez proces konfiguracji kliknij na „Wizard”. Kreator podzielony jest na sześć etapów. Postępuj zgodnie z poleceniami by przeprowadzić konfigurację routera. Krok 1 - Tryb pracy Router obsługuje trzy tryby pracy: Gateway (brama), Bridge (most), oraz Wireless ISP (bezprzewodowy dostawca Internetu). Każdy tryb jest przygotowany dla innego zastosowania, należy wybrać właściwy tryb. 40 www.
Wireless router Krok 2 - Ustawienia strefy czasowej Ustawienia serwera czasu umożliwiają konfigurowanie, aktualizowanie i utrzymanie właściwego czasu na wewnętrznym zegarze systemowym. Time Zone Select: Wybierz odpowiednią strefę czasową z menu rozwijanego. NTP Server: Wybierz Serwer NTP, z którego router ma pobierać informacje o aktualnym czasie. Krok 3 - Ustawienia sieci LAN Ustaw adres IP i maskę sieci dla interfejsu LAN.
Wireless router Tryb 1: Klient DHCP Wybierz DHCP Clent w celu uzyskania adresu IP automatycznie od dostawcy Internetu (ISP). Tryb ten jest powszechnie stosowany w przypadku stosowania modemu kablowego. Tryb 2: Static IP Wybierz opcję Static IP (stałego adresu IP), jeśli wszystkie informacje o adresie IP zostały dostarczone przez usługodawcę internetowego. Jeśli posiadasz te informacje wpisz je teraz: adres IP, maska podsieci, adres bramy oraz adres serwera DNS.
Wireless router Adres IP: Wpisz adres IP przypisany przez usługodawcę internetowego (Internet Service Provider). Maska podsieci: Wprowadź maskę podsieci przypisaną przez ISP. Default Gateway: Wpisz adres bramy przydzielony przez ISP. DNS: Wpisz adres serwera DNS podany przez ISP. Tryb 3: PPPoE Wybierz PPPoE (Point to Point Protocol over Ethernet), jeśli usługodawca internetowy używa połączenia PPPoE. Twój dostawca zapewni Ci login i hasło. Nazwa użytkownika: Wprowadź swoją nazwę użytkownika PPPoE.
Wireless router Adres IP: Wpisz adres IP. Maska podsieci: Wprowadź maskę podsieci. Adres IP serwera: Wprowadź adres IP serwera PPTP dostarczone przez ISP. Nazwa użytkownika: Wprowadź swoją nazwę użytkownika PPTP. Hasło: Wprowadź hasło PPTP. Tryb 5: L2TP Wybierz L2TP (Layer 2 Tunneling Protocol), jeśli usługodawca internetowy korzysta z tego połączenia. Dostawca powinien dostarczyć Ci login i hasło oraz wszystkie potrzebne informacje. IP Address: Wpisz adres IP. Subnet Mask: Wprowadź maskę podsieci.
Wireless router Krok 5. Ustawienia sieci bezprzewodowej (WLAN) Interfejs bezprzewodowy: Jeśli nie chcesz korzystać z bezprzewodowego, usuń zaznaczenie pola wyboru, aby wyłączyć wszystkie połączenia bezprzewodowe. Band: Obsługa 802.11b, 802.11g, 802.11n oraz trybu mieszanego. Wybierz swoje pasma w zależności od tego jakich standardów używają urządzenia, które będą łączyć się z routerem. Tryb: Obsługiwane są tryby – Punkt dostępowy (AP), Klient (Clent), WDS oraz AP + WDS.
Wireless router Krok 5. Ustawienia zabezpieczeń sieci bezprzewodowej (WLAN) Zabezpiecz sieć bezprzewodową poprzez włączenie funkcji zabezpieczeń WPA lub WEP na routerze. W tej sekcji możesz ustawić tryb zabezpieczeń WEP i WPA, WPA2 lub tryb mieszany. Poniższy rysunek pokazuje, jak ustawić zabezpieczenia WEP. Długość klucza: WEP obsługuje 64-bitowy klucz zabezpieczeń lub 128-bitowe. Key Format: Użytkownik może wpisać klucz w formacie ASCII lub Hex. Key Setting: Wprowadź klucz zgodny z wybranym formatem.
Wireless router • 128-bit: minimalna długość klucza: 13 znaków (dla kluczy składających się ze znaków “A-F”, “a-f”) 26 znaków (dla kluczy składających się z cyfr 0-9) Zalecane jest używanie kluczy składających się z małych i wielkich liter oraz cyfr – na przykład: “01234567890123456789aBcDEf” Poniższy rysunek przedstawia, jak ustawić zabezpieczenia WPA-PSK, można wybrać WPA (TKIP), WPA2 (AES) lub tryb mieszany. Pre-Shared Key Format: Określ format klucza, hasła lub hex.
Wireless router Rozdział 4 - Advanced Setup 4.1 Ustawienia zaawansowane sieci bezprzewodowej (WLAN) 4.1.1 WPS WPS został stworzony w celu ułatwienia konfiguracji sieci bezprzewodowej (Wi-Fi). Ten router obsługuje funkcję WPS w trybie punktu dostępowego (AP), AP + WDS, Infrastructure-Client oraz trybu powielania sygnału (Universal Repeater Mode). WPS: Zaznaczenie tego pola wyboru „Disable” i kliknięcie „OK” spowoduje wyłączenie funkcji WPS. Funkcja WPS jest domyślnie włączona.
Wireless router poczęta zostanie sesja WPS, w tym czasie migać będzie dioda WPS. Inne urządzenie sieciowe może połączyć się w tym czasie z routerem przez rozpoczęcie sesji WPS za pośrednictwem oprogramowania lub sprzętowego przycisku WPS. Dodatkowa uwaga – przytrzymanie przycisku WPS/Reset od 2 do 5 sekund spowoduje ponowne uruchomienie routera; dłużej niż 5 sekund – przywrócone zostaną ustawienia fabryczne. Client PIN number: Długość PIN jest ograniczona do czterech lub ośmiu cyfr.
Wireless router następnie włączyć funkcję WDS i podać adres MAC innego punktu dostępowego, z którym router ma się komunikować. WDS obsługuje szyfrowanie WEP i tryb zabezpieczeń WPA. Oczywiście w celu prawidłowej pracy punktu dostępowego, musisz ustawić ten sam kanał i tryb zabezpieczeń co w źródłowym punkcie dostępowym, którego sygnał ma być przekazywany. WDS: zaznacz to pole, aby włączyć funkcję WDS. MAC Address (Adres MAC): wpisz adres MAC źródłowego punktu dostępowego.
Wireless router na serwery lokalne posiadające prywatny adres IP. Innymi słowy, w zależności od usługi (numeru portu TCP / UDP), router przekierowuje zewnętrzne żądanie usługi do odpowiedniego serwera wewnątrz sieci lokalnej. Status: Zaznacz pole „Enable” by aktywować funkcję przekierowania portów (Port Forwarding). Adres IP: Adres, na który ma być przekierowane zapytanie od zewnętrznego użytkownika. Protokół i Port Rangę: pakiet z tego protokołu i portu, zostanie przekierowany na wskazany adres IP.
Wireless router Status: Włączenie i wyłączanie funkcji. Trigger Port Range: Zakres portów monitorowanych przez router dla ruchu wychodzącego. Połączenie wychodzące za pośrednictwem portu z tego zakresu wyzwoli ustanawianie reguł . Trigger Protocol: Protokół używany przez Port Trigger: TCP, UDP lub oba (Both). Incoming Port Range: Zakres portów lub port używany przez system podczas odpowiadania na żądanie wychodzące.
Wireless router Status: Włączenie i wyłączanie funkcji. Host IP Address: Wpisz adres IP hosta DMZ – używanie tej funkcji może narazić ten komputer na wiele zagrożeń. 4.2.4 Universal Plug and Play (UPnP) Funkcja UPnP pozwala urządzeniom uzyskać dostęp do lokalnych zasobów komputera lub innych urządzeń. Urządzenia UPnP mogą być automatycznie wykrywane przez usługi UPnP w sieci lokalnej. UPnP: Włączenie i wyłączanie funkcji. Uwaga: Wymieniony jest również przekazywany port dodany przez usługę UpnP. 4.
Wireless router Ping Access on WAN: Czy zezwolić lub zablokować usługę ping z interfejsu WAN. IGMP Proxy: Prosty, dynamiczny Demon Multicast Routing używający tylko sygnalizacji IGMP. Jest on przeznaczony do łatwego przekazywania ruchu Multicast pomiędzy sieciami. Web Server Access on WAN: Czy pozwolić na dostęp do serwera WWW z interfejsu WAN. VPN pass through: Przepuszczanie połączeń Virtual Private Network (VPN). 4.3.
Wireless router 2. Filtrowanie adresów MAC Przepuść lub zablokuj połączenia komputerów w oparciu o ich adresy MAC. 3. Filtr URL Możesz blokować niektóre adresy URL według słów kluczowych.
Wireless router dostępu do tego adresu URL, w przeciwnym razie reguła jest ważna tylko dla jednego komputera z tym adresem IP lub MAC. Przykład 1: Blokuj adres „testurl.com” dla wszystkich komputerów. Przykład 2: Blokuj dostęp do adresów zawierających słowo kluczowe „testkeyword” dla jednego komputera o adresie IP 192.168.1.105. Przykład 3: Blokuj dostęp do wszystkich adresów URL dla jednego komputera o adresie IP 192.168.1.105 w dni robocze od 09:00 do 18:00. 56 www.modecom.
Wireless router 4. Filtrowanie portów. Można ograniczyć dostęp niektórym lub wszystkim komputerom dostęp do adresu IP i portu docelowego. Przykład 1: Blokowanie dostępu do portu 21. Przykład 2: Blokowanie jednemu komputerowi (o adresie IP 192.168.1.101) dostępu do portu 21.
Wireless router 4.3.3 Blokowanie ataków typu Denial of Service (DoS) Ta strona zawiera ustawienia blokowania ataków DoS. 58 www.modecom.
Wireless router 4.4 Konfiguracja QoS QoS pozwala zwiększyć wydajność np. w grach przez nadawanie priorytetu aplikacjom. Domyślnie kontrola pasma jest wyłączona, a pierwszeństwo aplikacji nie jest automatycznie klasyfikowane. W celu skonfigurowania Qos, wykonaj następujące kroki: Włącz QoS. Wpisz wartość całkowitej prędkości połączenia lub pozwól na automatyczne wykrycie tych wartości. Wpisz adres(y) IP użytkownika(ów) dla których ma być stosowana reguła.
Wireless router 4.5 Router Setup Statyczna trasa to z góry określony szlak, którym pakiety danych muszą podróżować by dotrzeć do określonego hosta lub sieci. Static Route: Zaznacz pole „Enable”, aby umożliwić ustawienie trasy statycznej. Adres IP: Adres IP docelowej sieci lub hosta. Subnet Mask: Docelowa maska podsieci . Default Gateway: Adres IP Bramy, czyli routera lub komputera, do którego pakiet ma być wysłany. Adres ten musi być w tym samy segmencie sieci WAN lub LAN.
Wireless router 4.6.2 Zapisz / Wczytaj ustawienia routera Można wykonać kopię zapasową lub przywrócić konfigurację systemu na tej stronie. Save to File (Zapisz do pliku): Zapisz ustawienia routera na komputerze lokalnym. Load from File (Załaduj z pliku): Przywracanie ustawień routera z zapisanego pliku. Resotore factory (Przywróć ustawienia fabryczne): Przywracanie ustawień systemu do ustawień fabrycznych. 4.6.
Wireless router 4.6.4 Hasło Aby zapewnić bezpieczeństwo routera, użytkownik zostanie poproszony o podanie nazwy użytkownika i hasła przy próbie dostępu do panelu konfiguracyjnego routera. Domyślna nazwa użytkownika i hasło: admin / admin. Ta strona pozwoli Ci zmienić nazwę użytkownika i hasło. 62 www.modecom.
Wireless router Environment protection: This symbol on our product nameplates proves its compatibility with the EU Directive2002/96 concerning proper disposal of waste electric and electronic equipment (WEEE). By using the appropriate disposal systems you prevent the potential negative consequences of wrong product take-back that can pose risks to the environment and human health. The symbol indicates that this product must not be disposed of with your other waste.
Copyright© 2010. MODECOM S.A. All rights reserved. MODECOM Logo is a registered trademark of MODECOM S.A. www.modecom.