
Manual


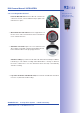

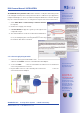


Table Of Contents
- Added Security Value
- Cost Benefits And Technical Advantages
- 2 INSTALLATION
- 3 OPERATING THE CAMERA
- 3.1 Manual And Automatic Operation - Overview
- 3.2 First Images And The Most Important Settings
- 3.3 Virtual PTZ
- 3.4 Correction Of Lens Distortion (L22 Only)
- 3.8 Additional Notes
- 3.8.1 Weatherproof Qualities
- 3.8.2 Password For The Administration Menu
- 3.8.3 Starting The Camera With The Factory IP Address
- 3.8.4 Reset The Camera To Factory Settings
- 3.8.5 Activate Event Control And Motion Detection
- 3.8.6 Deactivate Text And Logo Options
- 3.8.7 Deactivating The Daily Automatic Camera Reboot
- 3.8.8 Browser
- 3.8.9 Cleaning The Camera And Lens
- 3.8.10 Safety Warnings

www.mobotix.com • sales@mobotix.com
1.
Connect
the factory pre-installed cable of the camera to the
Camera
connector of
the Network Power Adapter.
2.
C
onnect the
connector of the Network Power Adapter to the Ethernet
connector of the Network Power Adapter to the Ethernet
port of the computer.
3.
P
lug the RJ45 connector of the external power unit into the
connector
connector
of the Network Power Adapter.
Connect the factory pre-installed cable of the camera to the Ethernet connector of the PoE
switch/router. The switch/router must support the PoE standard IEEE 802.3af.
For the D24M, you
should use the new
blue MX-NPA-PoE-Set
- previous MOBOTIX
network power acces-
sories such as the NPA
Set, Power Box and
Power Rack (MX-NPA-
Set, MX-NPR-4 and
MX-NPR8/20) are
not suitable for use
with the D24M
The IP addresses in
the diagram are shown
only as an example
The IP addresses in
the diagram are shown
only as an example