
Manual


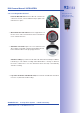

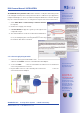


Table Of Contents
- Added Security Value
- Cost Benefits And Technical Advantages
- 2 INSTALLATION
- 3 OPERATING THE CAMERA
- 3.1 Manual And Automatic Operation - Overview
- 3.2 First Images And The Most Important Settings
- 3.3 Virtual PTZ
- 3.4 Correction Of Lens Distortion (L22 Only)
- 3.8 Additional Notes
- 3.8.1 Weatherproof Qualities
- 3.8.2 Password For The Administration Menu
- 3.8.3 Starting The Camera With The Factory IP Address
- 3.8.4 Reset The Camera To Factory Settings
- 3.8.5 Activate Event Control And Motion Detection
- 3.8.6 Deactivate Text And Logo Options
- 3.8.7 Deactivating The Daily Automatic Camera Reboot
- 3.8.8 Browser
- 3.8.9 Cleaning The Camera And Lens
- 3.8.10 Safety Warnings

www.mobotix.com • sales@mobotix.com
•
: Push the MicroSD card into the
card slot as shown, until an audible and perceptible click
indicates it is in place.
•
. Use the supplied foil or a
lint-free cotton cloth to insert the dome into its seat and turn
it in a clockwise direction.
•
: Replace the outer shell and screw
all four Allen screws tight using the supplied Allen wrench.
Ensure that the rubber seal is properly positioned.
•
: If you have inserted a MicroSD card that has already been MxFFS
formatted, you can activate recording under Admin Menu > Storage on External
File Server / Flash Device. Once the camera has been rebooted, it automatically
activates recording.
•
, it must first be formatted as described
in Section3.5, MicroSD Card Recording.
Push-push function:
insert the MicroSD
card and push it gently