
Manual
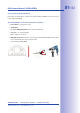
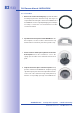

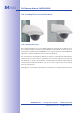


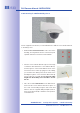
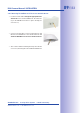

Table Of Contents
- Added Security Value
- Cost Benefits And Technical Advantages
- 2 INSTALLATION
- 3 OPERATING THE CAMERA
- 3.1 Manual And Automatic Operation - Overview
- 3.2 First Images And The Most Important Settings
- 3.3 Virtual PTZ
- 3.4 Correction Of Lens Distortion (L22 Only)
- 3.8 Additional Notes
- 3.8.1 Weatherproof Qualities
- 3.8.2 Password For The Administration Menu
- 3.8.3 Starting The Camera With The Factory IP Address
- 3.8.4 Reset The Camera To Factory Settings
- 3.8.5 Activate Event Control And Motion Detection
- 3.8.6 Deactivate Text And Logo Options
- 3.8.7 Deactivating The Daily Automatic Camera Reboot
- 3.8.8 Browser
- 3.8.9 Cleaning The Camera And Lens
- 3.8.10 Safety Warnings

www.mobotix.com • sales@mobotix.com
• as described in Section 3.2
First Images And
The Most Important Settings
.
Make sure that you see the live image of the camera on the monitor of your computer or
laptop. Now adjust the lens mount until you see the desired image area on your monitor:
• Use the supplied plastic foil
or a cotton cloth to remove the dome by turning it in a
counter-clockwise direction. With IT/Secure models, you
may have to remove the outer shell first.
• by turning it in a counter-
clockwise direction using the supplied hook wrench. In
addition, loosen the two Allen screws on both sides of the
lens mount slightly by turning them in a counter-clockwise
direction using the supplied Allen wrench.
Loosen the ring and screws until you are still able to pan
and rotate the internal part of the camera with the lens
without much force but not so far that the lens is unable
to move on its own.
• Now by rotating and panning the lens
mount (Note: the MicroSD card slot must point downward
for the camera's live image to be displayed properly). Never
use force when adjusting the direction of the camera, as
this could damage the camera beyond repair.