
Manual
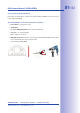
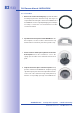

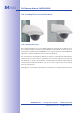


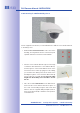

Table Of Contents
- Added Security Value
- Cost Benefits And Technical Advantages
- 2 INSTALLATION
- 3 OPERATING THE CAMERA
- 3.1 Manual And Automatic Operation - Overview
- 3.2 First Images And The Most Important Settings
- 3.3 Virtual PTZ
- 3.4 Correction Of Lens Distortion (L22 Only)
- 3.8 Additional Notes
- 3.8.1 Weatherproof Qualities
- 3.8.2 Password For The Administration Menu
- 3.8.3 Starting The Camera With The Factory IP Address
- 3.8.4 Reset The Camera To Factory Settings
- 3.8.5 Activate Event Control And Motion Detection
- 3.8.6 Deactivate Text And Logo Options
- 3.8.7 Deactivating The Daily Automatic Camera Reboot
- 3.8.8 Browser
- 3.8.9 Cleaning The Camera And Lens
- 3.8.10 Safety Warnings

www.mobotix.com • sales@mobotix.com
The 3 mm thick stainless steel Corner and Pole Mount is extremely robust and rust-proof.
It is used (exclusively) in conjunction with the Wall Mount described in Section 2.9 in situa-
tions where you want to mount a D24M IT/Secure to a pole or wall corner. The Wall Mount
required for complete installation must be ordered separately.
The mounting pole should have a diameter of between 60 and 180 mm. Attaching the
camera to the corner of a wall not only makes sense from an aesthetic perspective, but
also allows you to monitor an area that is not specifically covered by the camera without
incurring major building modification costs. In such cases, only the lens of the camera
has to be repositioned.
By design, the Corner and Pole Mount does not allow the use of a flush-mounted socket.