
Manual
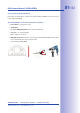
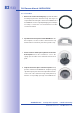

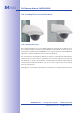


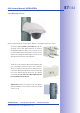
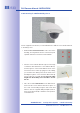
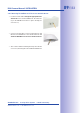

Table Of Contents
- Added Security Value
- Cost Benefits And Technical Advantages
- 2 INSTALLATION
- 3 OPERATING THE CAMERA
- 3.1 Manual And Automatic Operation - Overview
- 3.2 First Images And The Most Important Settings
- 3.3 Virtual PTZ
- 3.4 Correction Of Lens Distortion (L22 Only)
- 3.8 Additional Notes
- 3.8.1 Weatherproof Qualities
- 3.8.2 Password For The Administration Menu
- 3.8.3 Starting The Camera With The Factory IP Address
- 3.8.4 Reset The Camera To Factory Settings
- 3.8.5 Activate Event Control And Motion Detection
- 3.8.6 Deactivate Text And Logo Options
- 3.8.7 Deactivating The Daily Automatic Camera Reboot
- 3.8.8 Browser
- 3.8.9 Cleaning The Camera And Lens
- 3.8.10 Safety Warnings

www.mobotix.com • sales@mobotix.com
5.
: Stick the
black wall sealing to the back of the Wall Mount (remove
the adhesive foil first, the surface must be clean and
free of grease). Pass the network cable through the
large square opening and into the Wall Mount. Use
the included screws to install the Wall Mount (without
the camera) at the intended position. Pass the network
cable through the large square opening on back side
of the Wall Mount.
6.
: Prepare the on-site network cable
for connection with the camera patch cable using a
standard connector. Excess cable can be stored easily
within the Wall Mount.
7.
Mount
: Connect the camera patch cable to the network
cable. Then mount the bottom plate with the camera
in the slots from below and fix it in place on the Wall
Mount using the 4 Allen screws (Allen wrench included).
8.
Proceed
to Section 2.11, Aiming And Adjusting The Lens.